Quantcast
Channel: Accelerate your business
Viewing all 140 articles
Browse latest View live

Cross framework services in jBPM 6.2

$
0
0
jBPM version 6 comes with quite a few improvements that allow developers build their own systems with BPM and BRM capabilities just to name few:
  • jar based deployment units - kjar
  • deployment descriptors for kjars
  • runtime manager with predefined runtime strategies
  • runtime engine with configured components
    • KieSession
    • TaskService
    • AuditService (whenever persistence is used)
While these are certainly bringing lots of improvements in embedability of jBPM into custom application they do come with some challenges in terms of how they can be consumed. Several pieces need to come along to have it properly supported and reliably running:
  • favor use of RuntimeManager and RuntimeEngine whenever performing work instead of using cached ksession and task service instance
  • Cache only RuntimeManager not RuntimeEngine or runtime engine's components
  • Creating runtime manger requires configuration of various components via runtime environment - way more simplified compared to version 5 but still...
  • On request basis always get new RuntimeEngine with valid context, work with ksession, task service and then dispose runtime engine
All these (and more) were sometimes forgotten or assumed will be done automatically while they weren't. And even more issues could arise when working with different frameworks - CDI, ejb, spring, etc.

Rise of jBPM services (redesigned in version 6.2)

Those who are familiar with jBPM console (aka kie workbench) code base might already be aware of some services that were present from version 6.0 and through 6.1. Module that encapsulated these services is jbpm-kie-services. This module was purely written with CDI in mind and all services within it were CDI based. There was additional code to ease consumption of them without CDI but that did not work well - mainly because as soon as the code was running in CDI container (JEE6 application servers) CDI got into the way and usually caused issues due to unsatisfied dependencies.

So that (obviously not only that :)) brought us to a highly motivated decision - to revisit the design of these services to allow more developer friendly implementation that can be consumed regardless of what framework one is using.

So with the design we came up with following structure:
  • jbpm-services-api - contains only api classes and interfaces
  • jbpm-kie-services - rewritten code implementation of services api - pure java, no framework dependencies
  • jbpm-services-cdi - CDI wrapper on top of core services implementation
  • jbpm-services-ejb-api - extension to services api for ejb needs
  • jbpm-services-ejb-impl - EJB wrappers on top of core services implementation
  • jbpm-services-ejb-client - EJB remote client implementation - currently only for JBoss
Service modules are grouped with its framework dependencies, so developers are free to choose which one is suitable for them and use only that. No more issues with CDI if I don't want to use CDI :)

Let's now move into the services world and see what we have there and how they can be used. First of all they are grouped by their capabilities:

DeploymentService

As the name suggest, its primary responsibility is to deploy (and undeploy) units. Deployment unit is kjar that brings in business assets (like processes, rules, forms, data model) for execution. Deployment services allow to query it to get hold of available deployment units and even their RuntimeManager instances.

NOTE: there are some restrictions on EJB remote client to do not expose RuntimeManager as it won't make any sense on client side (after it was serialized).

So typical use case for this service is to provide dynamic behavior into your system so multiple kjars can be active at the same time and be executed simultaneously.
// create deployment unit by giving GAV
DeploymentUnit deploymentUnit = new KModuleDeploymentUnit(GROUP_ID, ARTIFACT_ID, VERSION);
// deploy
deploymentService.deploy(deploymentUnit);
// retrieve deployed unit
DeployedUnit deployed = deploymentService.getDeployedUnit(deploymentUnit.getIdentifier());
// get runtime manager
RuntimeManager manager = deployed.getRuntimeManager();

Deployment service interface and its methods can be found here.

DefinitionService

Upon deployment, every process definition is scanned using definition service that parses the process and extracts valuable information out of it. These information can provide valuable input to the system to inform users about what is expected. Definition service provides information about:
  • process definition - id, name, description
  • process variables - name and type
  • reusable subprocesses used in the process (if any)
  • service tasks (domain specific activities)
  • user tasks including assignment information
  • task data input and output information
So definition service can be seen as sort of supporting service that provides quite a few information about process definition that are extracted directly from BPMN2.

String processId = "org.jbpm.writedocument";

Collection<UserTaskDefinition> processTasks =
bpmn2Service.getTasksDefinitions(deploymentUnit.getIdentifier(), processId);

Map<String, String> processData =
bpmn2Service.getProcessVariables(deploymentUnit.getIdentifier(), processId);

Map<String, String> taskInputMappings =
bpmn2Service.getTaskInputMappings(deploymentUnit.getIdentifier(), processId, "Write a Document" );

While it usually is used with combination of other services (like deployment service) it can be used standalone as well to get details about process definition that do not come from kjar. This can be achieved by using  buildProcessDefinition method of definition service.

Definition service interface can be found here.

ProcessService

Process service is the one that usually is of the most interest. Once the deployment and definition service was already used to feed the system with something that can be executed. Process service provides access to execution environment that allows:

  • start new process instance
  • work with existing one - signal, get details of it, get variables, etc
  • work with work items
At the same time process service is a command executor so it allows to execute commands (essentially on ksession) to extend its capabilities.
Important to note is that process service is focused on runtime operations so use it whenever there is a need to alter (signal, change variables, etc) process instance and not for read operations like show available process instances by looping though given list and invoking getProcessInstance method. For that there is dedicated runtime data service that is described below.

An example on how to deploy and run process can be done as follows:
KModuleDeploymentUnit deploymentUnit = new KModuleDeploymentUnit(GROUP_ID, ARTIFACT_ID, VERSION);

deploymentService.deploy(deploymentUnit);

long processInstanceId = processService.startProcess(deploymentUnit.getIdentifier(), "customtask");

ProcessInstance pi = processService.getProcessInstance(processInstanceId);

As you can see start process expects deploymentId as first argument. This is extremely powerful to enable service to easily work with various deployments, even with same processes but coming from different versions - kjar versions.

Process service interface can be found here.

RuntimeDataService

Runtime data service as name suggests, deals with all that refers to runtime information:

  • started process instances
  • executed node instances
  • available user tasks 
  • and more
Use this service as main source of information whenever building list based UI - to show process definitions, process instances, tasks for given user, etc. This service was designed to be as efficient as possible and still provide all required information.

Some examples:
1. get all process definitions
Collection definitions = runtimeDataService.getProcesses(new QueryContext());

2. get active process instances

Collection instances = runtimeDataService.getProcessInstances(new QueryContext());
3. get active nodes for given process instance

Collection instances = runtimeDataService.getProcessInstanceHistoryActive(processInstanceId, new QueryContext());
4. get tasks assigned to john

List taskSummaries = runtimeDataService.getTasksAssignedAsPotentialOwner("john", new QueryFilter(0, 10));

There are two important arguments that the runtime data service operations supports:

  • QueryContext
  • QueryFilter - extension of QueryContext
These provide capabilities for efficient management result set like pagination, sorting and ordering (QueryContext). Moreover additional filtering can be applied to task queries to provide more advanced capabilities when searching for user tasks.

Runtime data service interface can be found here.

UserTaskService

User task service covers complete life cycle of individual task so it can be managed from start to end. It explicitly eliminates queries from it to provide scoped execution and moves all query operations into runtime data service.
Besides lifecycle operations user task service allows:
  • modification of selected properties
  • access to task variables
  • access to task attachments
  • access to task comments
On top of that user task service is a command executor as well that allows to execute custom task commands.

Complete example with start process and complete user task done by services:

long processInstanceId =
processService.startProcess(deployUnit.getIdentifier(), "org.jbpm.writedocument");

List<Long> taskIds =
runtimeDataService.getTasksByProcessInstanceId(processInstanceId);

Long taskId = taskIds.get(0);

userTaskService.start(taskId, "john");
UserTaskInstanceDesc task = runtimeDataService.getTaskById(taskId);

Map<String, Object> results = new HashMap<String, Object>();
results.put("Result", "some document data");
userTaskService.complete(taskId, "john", results);

That concludes quick run through services that jBPM 6.2 will provide. Although there is one important information left to be mentioned. Article name says it's cross framework services ... so let's see various in action:

  • CDI - services with CDI wrappers are heavily used (and by that tested) in jbpm console - kie-wb. Entire execution server that comes in jbpm console is utilizing jbpm services over its CDI wrapper.
  • Ejb - jBPM provides a sample ejb based execution server (currently without UI) that can be downloaded and deployed to JBoss - it was tested with JBoss but might work on other containers too - it's built with jbpm-services-ejb-impl module
  • Spring - a sample application has been developed to illustrate how to use jbpm services in spring based application

The most important thing when working with services is that there is no more need to create your own implementations of Process service that simply wraps runtime manager, runtime engine, ksession usage. That is already there. It can be nicely seen in the sample spring application that can be found here. And actually you can try to use that as well on OpenShift Online instance here.
Go to application on Openshift Online
 Just logon with:

  • john/john1
  • mary/mary1
If there is no deployments available deploy one by specifying following string:
org.jbpm:HR:1.0
this is the only jar available on that instance.

And you'll be able to see it running. If you would like to play around with it on you own, just clone the github repo build it and deploy it. It runs out of the box on JBoss EAP 6. For tomcat and wildfly deployments see readme file in github.

That concludes this article and as usual comments and ideas for improvements are more than welcome.

As a side note, all these various framework applications built on top of jBPM services can simply work together without additional configuration just by configuring to be backed by the same data base. That means:
  • deployments performed on any of the application will be available to all applications automatically
  • all process instances and tasks can be seen and worked on via every application
that provides us with truly cross framework integration with guarantee that they all work in the same way - consistency is the most important when dealing with BPM :)


Process instance migration made easy

$
0
0
jBPM 6 comes with an excellent deployment model based on knowledge archives which allows different versions of given project to run in parallel in single execution environment. That is very powerful but at the same time brings some concerns about how to deal with them, to name few:

  • shall users run both old and new version of the processes?
  • what shall happen to already active process instances started with previous version?
  • can active versions be migrated to newer version and vice versa?

While there might be other concerns, one of the most frequently asked question is such situation is: can I migrate active process instance?

So can we do process migration with jBPM?

The straight answer is - YES

... but it was not easily available to be performed via jbpm console (aka kie-workbench). This article is about to introduce solution to this limitation by providing ... knowledge archive that can be deployed to your installation and simply used to migrate any process instance. I explicitly use term "migrate" instead of upgrade because it can actually be used in both directions (from lower to higher version or from higher to lower version).

So there are quite few things that might happen when such operation is performed. All depends on the changes between versions of the process definition that are part of the migration. So what does this process migration comes with:

  • it can migrate from one process to another within same kjar
  • it can migrate from on process to another across kjars
  • it can migrate with node mapping between process versions 

While the first two options are simple, the third one might require some explanation. What is node mapping? While doing changes in process versions we might end up in situation that nodes/activities are replaced with another node/activity and by that when migrating between these versions mapping needs to take place. Another aspect is when you would like to skip some nodes in current version (see second example).

NOTE: mapping will happen only for active nodes of the process instance that is being migrated.

Be careful what you migrate...

Migration does not affect any data so please take that into account when performing migration as in case there were changes on data level process instance migration will not be able to resolve potential conflicts and that might lead to problems after migration.

To give you some heads up about how does it work, here comes two screencasts that showcase its capabilities in actions. For this purpose we use our standard Evaluation process that is upgraded with new version and active process instance is migrated to next version.

Simple migration of process instance

This case is about showing how simple it can be to migrate active process instance from one version to another:
  • default org.jbpm:Evaluation:1.0 project is used which consists of single process definition - evaluation with version 1
  • single process instance is started with this version
  • after it has been started, new version of evaluation process is created
  • upgraded version is then released as part of org.jbpm:Evaluation:2.0 project with process version 2
  • then migration of the active process instance is performed
  • results of the process instance migration is the illustrated on process model of active instance and as outcome of the process instance migration

Process instance migration with node mapping

In this case, we go one step further and add another node to Evaluation process (version 2) to skip one of the nodes from original version. So to do that, we need to map nodes to be migrated. Steps here are almost the same as in first case with the difference that we need to go over additional steps to collect node information and then take manual decision (over user task) what nodes are mapped to new version. Same feedback is given about results.


Ready to give it a go?

To play with it, make sure you have jBPM version 6.2 (currently available at CR level from maven repository but soon final release will be available) and then grab this repository into your jbpm console (kie-wb) workspace - just clone it directly in kie-wb. Once it's cloned simply build and deploy and you're ready to migrate any process instance :).

Feedback, issues, ideas for improvements and last but not least contribution is more than welcome.

Keep your jBPM environment healthy

$
0
0
Once jBPM is deployed to given environment and is up and running most of actual maintenance requirements come into the picture. Running BPM deployment will have different maintenance life cycle depending on the personas involved:

  • business users would need to make sure latest versions of processes are in use
  • administrators would need to make sure that entire infrastructure is healthy 
  • developers would need to make sure all projects are available to their systems

In this article I'd like to focus on administrators to give them a bit of power to maintain jBPM environments in a easier way. So let's first look at what sort of thing they can be interested with....

jBPM when configured to use persistence will store its state into data base over JPA. That is regardless if jbpm-console/kie-wb is used or jBPM runs in embedded mode. Persistence can be divided into two sections:
  • runtime data - current state of active instances (processes, tasks, jobs)
  • audit data - complete view of all states of instances (processes, tasks, events, variables)
Above diagram presents only subset of data model for jBPM and aims at illustrating important parts from maintenance point of view.

Important information here is that "runtime data" is cleaned up automatically on life cycle events:
  • process instance information will be removed upon process instance completion
  • work item information will be removed upon work item completion
  • task instance information (including content) will be removed upon completion of a process instance that given tasks belongs to
  • session information clean up depends on the runtime strategy selected
    • singleton - won't be removed at all
    • per request will be removed as soon as given request ends
    • per process instance - will be removed when process instance mapped to given session completes (or aborts)
  • executor's request and error information is not removed
So far so good, we have cleanup procedure in place but at the same time we loose all trace of process instances being executed at all. In most of the case this is not an acceptable solution...

And because of that there are audit data tables available (and used by default) to keep trace of what has been done, moreover it does keep track of what is happening in the environment as well. So it is actually great source of information in any given point in time. Thus name audit data might be slightly misleading ... but don't worry it is the first class citizen and is actually used by jbpm services  to provide you with all the details about current view on past and present.

So that puts us in tight spot - that data is gathered in audit tables but we do not have control over how long would that be stored in these tables. In environments that do operate on large number of process instances and task instances this might be seen as a problem. To help with this maintenance burden a clean up procedure has been provided (from version 6.2) that will allow two approaches to the topic:
  • automatic clean up as scheduled job running in background on defined intervals
  • manual clean up by taking advantage of the audit API

LogCleanupCommand

LogCleanupCommand is jbpm executor command that consists of logic to clean up all (or selected) audit data automatically. That logic is simply taking advantage of audit API to clean it up but provides one significant benefit - it can be scheduled and executed repeatedly by using reoccurring jobs feature of jbpm executor. Essentially this means that once job completes it provides information to the jbpm executor if and when next instance of this job should be executed. By default LogCleanupCommand is executed one a day from the time it was scheduled for the first time. It of course can be configured to run on different intervals.

NOTE: LogCleanupCommand is not registered to be executed out of the box to do not remove data without explicit request so it needs to be started as new job, see short screen cast on how to do it.

LogCleanupCommand comes with several configuration options that can be used to tune the clean up procedure.


NameDescriptionIs exclusive
SkipProcessLogIndicates if clean up of process instance, node instance and variables log cleanup should be omitted (default false)No, can be used with other parameters
SkipTaskLogIndicates if task audit and task event logs cleanup should be omitted (default false)No, can be used with other parameters
SkipExecutorLogIndicates if jbpm executor entries cleanup should be omitted (default false)No, can be used with other parameters
SingleRunIndicates if the job should run only once default falseNo, can be used with other parameters
NextRunDate for next run in time expression e.g. 12h for jobs to be executed every 12 hours, if not given next job will run in 24 hours from time current job completesYes, cannot be used when OlderThanPeriod is used
OlderThanDate that logs older than should be removed - date format YYYY-MM-DD, usually used for single run jobsYes, cannot be used when OlderThan is used
OlderThanPeriodTimer expression that logs older than should be removed - e.g. 30d to remove logs older than 30 day from current timeNo, can be used with other parameters
ForProcessProcess definition id that logs should be removed forNo, can be used with other parameters
ForDeploymentDeployment id that logs should be removed forNo, can be used with other parameters
EmfNamePersistence unit name that shall be used to perform delete operationsN/A

Another important aspect of the LogCleanupCommand is that it protects the data it removes by making sure it won't delete active instances such as still running process instances, task instance or executor jobs.

NOTE: Even though there are several options to use to control what data shall be removed, recommended is to always use date as all audit data tables do have timestamp while some do not have other parameters (process id or deployment id).


A short screencast shows how LogCleanupCommand can be used in practice. It shows to scenarios (two execution of a command) where both are just single run:

  • first that attempts to remove everything that is older than 1 day
  • second that removes everything that is older than current time - not parameter for date is given
For the first run we only see that one job has been removed as only that met the criteria to be older than 1 day and all other was started same day. Then the second run that removes everything that was completed did actually removed them as expected.

Manual cleanup via audit API

Instead of having automatic cleanup of jobs, administrators can make use of audit API to do the clean up manually with more control over parameters to control what is to be removed. Audit API is divided in three areas (same as shown on the diagram) that covers different parts of the environment:
  • process audit to clean up process, node and variables logs via jbpm-audit module
  • task audit to clean up tasks and task events via jbpm-human-task-audit module
  • executor jobs to cleanup jbpm executor jobs and errors via jbpm-executor module
API cleanup support is done in hierarchical way so in case all needs to be cleaned up it's enough to take the last audit service from hierarchy and all operations will be available.
  • org.jbpm.process.audit.JPAAuditLogService
  • org.jbpm.services.task.audit.service.TaskJPAAuditService
  • org.jbpm.executor.impl.jpa.ExecutorJPAAuditService
Example 1 - remove completed process instance logs
JPAAuditLogService auditService = new JPAAuditLogService(emf);
ProcessInstanceLogDeleteBuilder updateBuilder = auditService.processInstanceLogDelete().status(ProcessInstance.STATE_COMPLETED);
int result = updateBuilder.build().execute();

Example 2 - remove task audit logs for deployment org.jbpm:HR:1.0
TaskJPAAuditService auditService = new TaskJPAAuditService(emf);
AuditTaskInstanceLogDeleteBuilder updateBuilder = auditService.auditTaskInstanceLogDelete().deploymentId("org.jbpm:HR:1.0");
int result = updateBuilder.build().execute();

Example 3 - remove executor error and requests
ExecutorJPAAuditService auditService = new ExecutorJPAAuditService(emf);
ErrorInfoLogDeleteBuilder updateBuilder = auditService.errorInfoLogDeleteBuilder().dateRangeEnd(new Date());
int result = updateBuilder.build().execute();

RequestInfoLogDeleteBuilder updateBuilder = auditService.requestInfoLogDeleteBuilder().dateRangeEnd(new Date());
result = updateBuilder.build().execute();

NOTE: when removing jbpm executor entries make sure first error info is removed before request info can be removed due to constraints setup on data base.

See API for various options on how to configure cleanup operations:

Equipped with these features jBPM environment can be kept clean and healthy for long long time without much effort.

Ending always same way - feedback is more than welcome.

jBPM talk and workshop at DevConf 2015

$
0
0
I am happy to announce that a talk and workshop about jBPM 6 has been accepted at DevConf 2015 in Brno.

Talk: jBPM - BPM Swiss knife

During the presentation jBPM will be introduced from the Process Engine & framework perspective.The main goal of the session is to share with the community of developers how they can improve their systems implementations and integrations by using a high level, business oriented methodology that will help to improve the performance of the company. jBPM will help to keep the infrastructural code organized and decoupled from the business knowledge. During the presentation the new APIs and new modules in jBPM version 6 will be introduced for the audience to have a clear spectrum of the tools provided.

Speaker: Maciej Swiderski

Workshop: Get your hands dirty with jBPM 

This is continuation of the presentation of jBPM (jBPM - BPM swiss knife) that introduces to jBPM while this is mainly focused on making use of that knowledge in real cases. On this workshop users will be able to see in action jBPM from both perspectives:
  • as a services when jBPM is used as BPM platform
  • as embedded when jBPM is used as a framework in custom applications
This workshop is intended to give a quick start with jBPM and help users to decide which approach is most suitable for their needs.

Speakers:
Jiri Svitak
Maciej Swiderski
Radovan Synek

Schedule for the complete conference can be found here. See you there!!!

MultiInstance Characteristic example - Reward Process

$
0
0
One of a great features of BPMN (and not only) is the multi instance activity aka for each. To put it simple same activity is repeated for each item from input collection. That is usually good fit for distributing work across number of people to gather their input or opinion.
jBPM provides support for it since version 5 but it was enhanced with every version. Current support covers:

  • subprocess and individual task
  • input and output as collection
  • completion condition on entire multi instance activity (subprocess or task)

Equipped with that we can build powerful processes with simplified structure. Even more than that: it's all dynamic meaning number of instances can (and actually should as best practice) reference process variables for both input and output.

To show it in practice we go over an example that is based on Eric Shabell's Reward demo. It has been only slightly modified to focus mainly on the multi instance support jBPM comes with in version 6.2 community. 

So what we have in this process?
  1. When process start it will ask for some details about the person who shall receive award and its details
  2. Once instance is started it will go into 'Associate Reviews' user task where associate needs to provide following information:
    1. how many peer reviews should be performed
    2. how many of them are required to move on without waiting for all to be completed
  3. Once this information is available 'Setup Reviews' task will prepare all required structures and populate process variables that will feed multi instance subprocess
  4. 'Evaluate Award' task will be created multiple times based on (2.1) selection
  5. Each instance of that user task will ask for approval and result of it will be kept in multi instance output collection
  6. It has a completion condition that will evaluate result every time one instance of 'Evaluate Award' task is completed as soon as it becomes true it will move on and cancel remaining task instances of 'Evaluate Award'
  7. 'Calculate results' will be performed to check what output is collected - if award is approved or rejected and based on that will go to one of the paths.
So let's review process configuration in details, starting with process variables


This in general is nothing special, just worth noting two variables:
  • reviews_collection
  • reviews_results
both are of type java.util.ArrayList (they can be of any collection type) and they will be used for configuring multi instance subprocess. Important to note is that both must be non null before they can be used in multi instance activity.

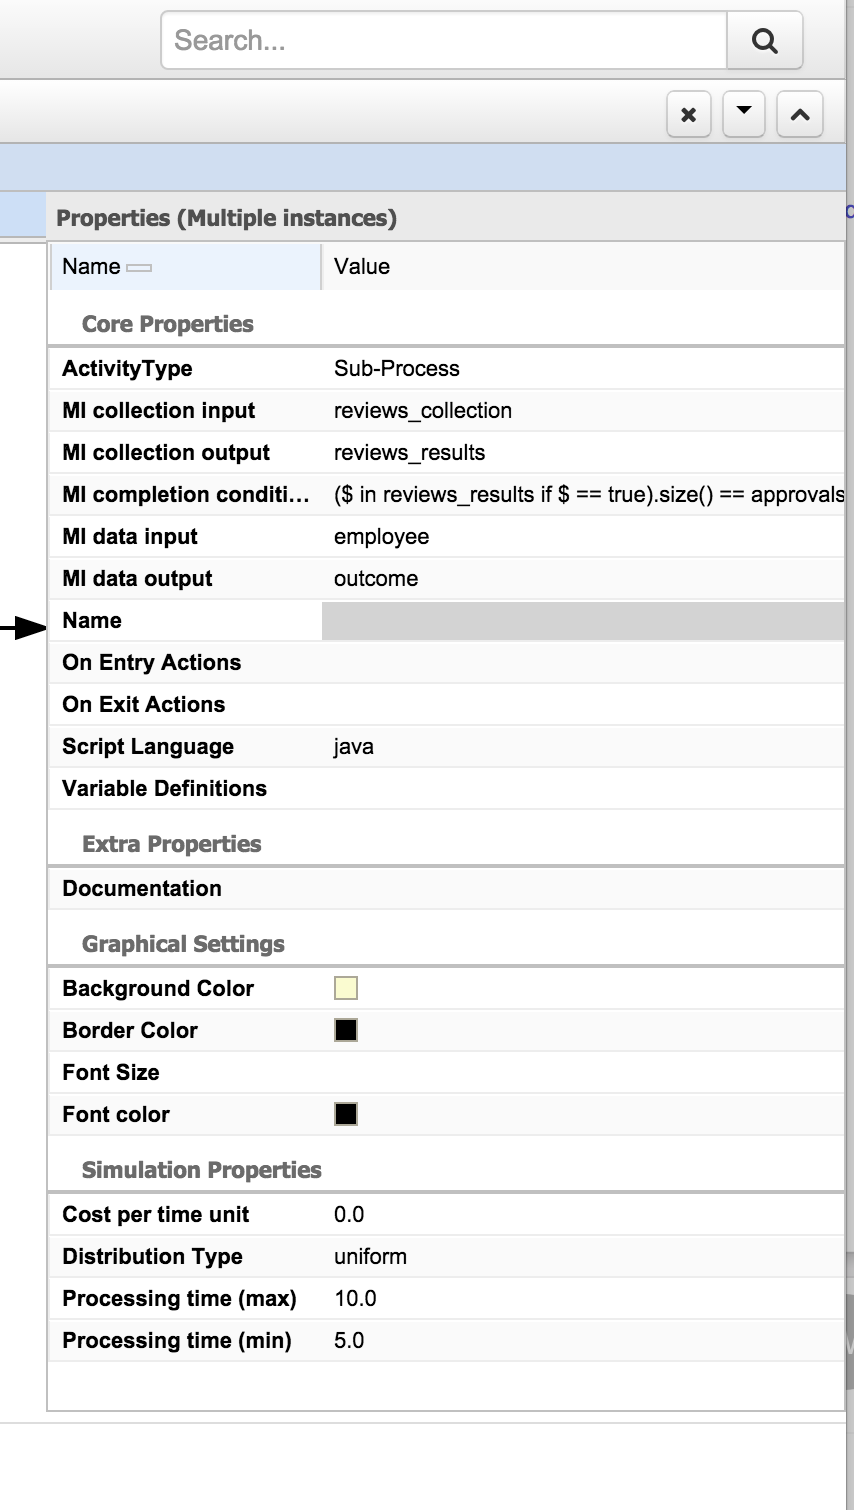
Next let's review how the multi instance activity is configured:

MI collection input - this is the collection which will be used to create individual instances of given activity. In other words, each element from that collection will be assigned to separate activity instance.
MI collection output - this is the collection which will collect results of execution of multi instance activity - will aggregate all results produced. This is optional as not every multi instance activity must produce result that shall be collected.
MI completion condition - expression (currently MVEL) that will be evaluated at every completion of activity instance and as soon as it becomes true it will leave multi instance activity even if not all instances are completed. Those not completed will be canceled.
MI data input - this is the variable name that will be given to individual activity instances produced by multi instance activity. 
MI data output - this is the variable name where the output of individual activity instance will be stored. It's optional as not all activities must produce results


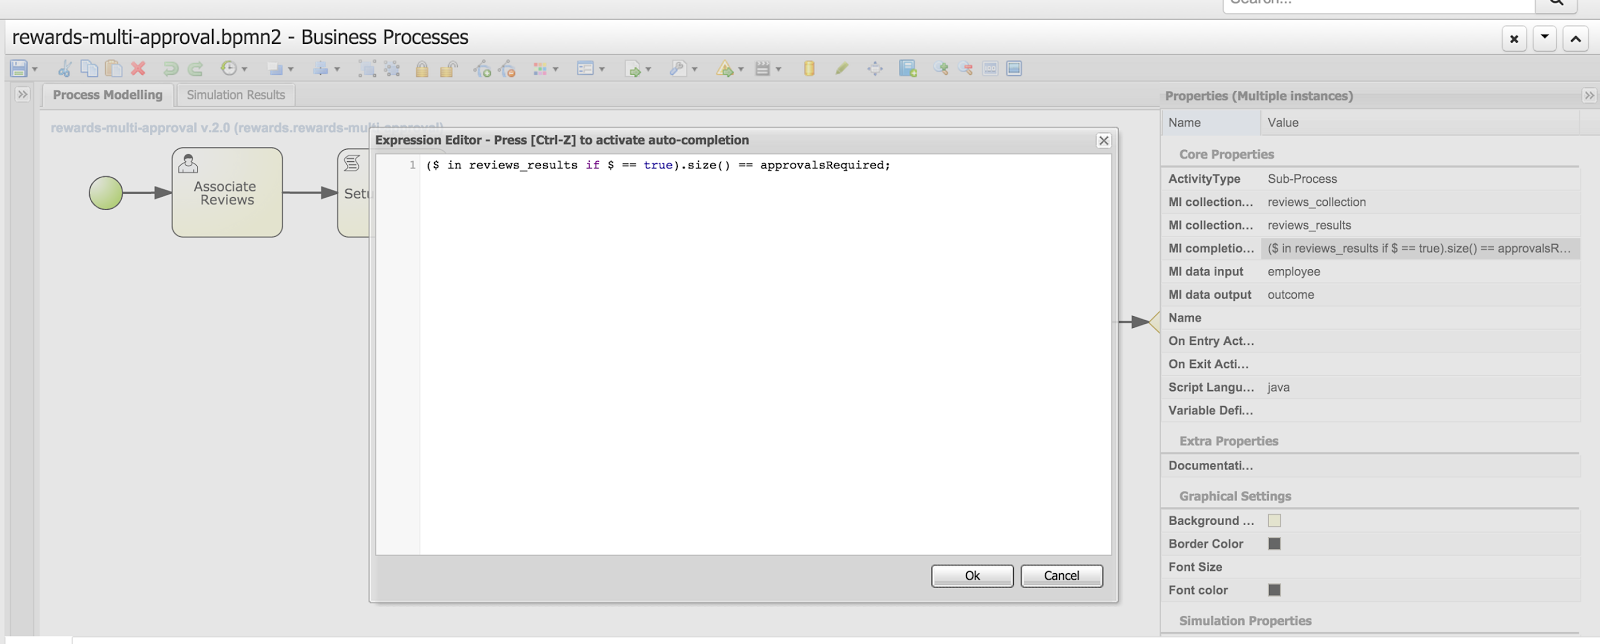
Last but not least let's take a look in details at the completion condition as it provide quite powerful way of controlling multi instance activity completion.

In case it won't be readable (or for copy paste reason) here is the expression:

($ in reviews_results if $ == true).size() == approvalsRequired;

so what does it say? In general it evaluates all items in the 'reviews_results' collection and counts all elements that has value set to 'true'. Next it compares its size with the 'approvalsRequired' process variable to check if already collected approvals is enough.

For those interested, this is MVEL projections example which gives very powerful option to operate on collections.

That would be all to this article. For complete runnable example visit github. You can directly clone it from your kie-workbench installation (aka jbpm console) and run it there. It comes with all required parts:
  • process
  • forms
  • data model
All configured and ready to be executed (just make sure you run on jBPM 6.2 or higher). Enjoy

As usual comments and feedback most welcome.

jBPM 6.2 installation and upgrade from previous version

$
0
0
jBPM 6.2 is almost out the door so it's time to give a quick heads up on how to install and upgrade if you already have previous version of jBPM running.

Installation with jBPM installer

the easiest and best way to install jBPM is using jBPM installer that is described in jBPM documentation. It's simple and automated installation process that:
  • downloads all required components
  • configures services (data source, folder structure, etc)
  • bundles the application 
  • deploys all applications (jbpm console aka kie workbench and dash builder for BAM)
All is done with ant script so it can be modified in case additional requirements pops up. Most of the information users could be interested in is stored in build.properties file which defines
  • version numbers of components to download, 
  • container to be used
  • data base to be used
So if you're going to try jBPM for the first time, I would recommend to go with this approach.

Installation on Wildfly 8.1.0.Final application server

Another approach would be to configure parts of the application and application server manually on clean or already existing Wildfly server. Following are the steps required:
  1. Create data source for jbpm to use - if you want to use default in memory data base that comes with Wildfly server you can skip this step - data source is already defined
    1. Create JBoss module for your JDBC driver e.g. org/postgres
    2. Edit WILDFLY_HOME/standalone/configuration/standalone-full.xml
    3. Define data source for the driver you created e.g. postgres
    4. <xa-datasource jndi-name="java:jboss/datasources/jbpmDS" pool-name="postgresDS" enabled="true" use-java-context="true">
      <xa-datasource-property name="ServerName">
      localhost
      </xa-datasource-property>
      <xa-datasource-property name="PortNumber">
      5432
      </xa-datasource-property>
      <xa-datasource-property name="DatabaseName">
      jbpm
      </xa-datasource-property>
      <driver>postgres</driver>
      <security>
      <user-name>jbpm</user-name>
      <password>jbpm</password>
      </security>
      </xa-datasource>
  2. Add application users that will be given access to kie workbench
    1. Use WILDFLY_HOME/bin/add_user.sh script (or add_user.bat for windows) to add user(s)
      1. Use application realm
      2. make sure to assign users one or more of following roles: admin,analyst,user,developer,manager
      3. Additionally you can assign your user to any other roles that will be used for human task assignments e.g HR,PM,IT,Accounting for HR example process
      4. If you would like to use asset management feature that comes with 6.2 assign your user another role called: kiemgmt
  3. Download wildfly distribution of the kie workbench for version 6.2.0.Final from here.
  4. Extract the war file into WILDFLY_HOME/standalone/deployments/jbpm-console.war
    1. You should have all files from the war file inside jbpm-console.war
  5. Configure persistence for jbpm console
    1. Edit WILDFLY_HOME/standalone/deployments/jbpm-console.war/WEB-INF/classes/META-INF/persistence.xml file
    2. Change JNDI name for the data source
    3. Change the hibernate dialect for data base you use
  6. Create jbpm-console.war.dodeploy empty file inside WILDFLY_HOME/standalone/deployments directory
That's all, now you're ready to start your application server with jbpm console (kie workbench) deployed. To do that go into WILDFLY_HOME/bin and issue following command:
./standalone.sh --server-config=standalone-full.xml

or for windows
./standalone.bat --server-config=standalone-full.xml

NOTE: If you don't have internet access or you don't want to load example repositories from github add following parameter into the server startup command: -Dorg.kie.demo=false

./standalone.sh --server-config=standalone-full.xml -Dorg.kie.demo=false

or for windows
./standalone.bat --server-config=standalone-full.xml -Dorg.kie.demo=false

Upgrade jBPM from 6.1 to 6.2

Upgrading of already existing installation of jBPM console (kie-workbench) that runs with version 6.1 (though from 6.0.1 should be pretty much the same though I haven't tested myself) is quite simple, but requires some steps to be manually executed.

There are some data base changes that must be applied to successfully upgrade workbench to version 6.2 and do not loose any context - like missing deployments, nor not being able to see process or task instances. 

So let's upgrade existing 6.1 environment
  1. Shutdown your existing server(s) that run jBPM 6.1 - if there are any running instances
  2. Perform data base upgrade
    1. jBPM 6.2. comes with upgrade script for commonly used data bases, it can be found as part of jbpm installer/db/upgrade-scripts package or can be taken from gihub.
    2. This script contains all data bases so please take only section that applies to your data base (below sql script for postgesql data base as an example)
    3. ALTER TABLE sessioninfo ALTER COLUMN id TYPE bigint;
      ALTER TABLE AuditTaskImpl ALTER COLUMN processSessionId TYPE bigint;
      ALTER TABLE ContextMappingInfo ALTER COLUMN KSESSION_ID TYPE bigint;
      ALTER TABLE Task ALTER COLUMN processSessionId TYPE bigint;

      create table DeploymentStore (
      id int8 not null,
      attributes varchar(255),
      DEPLOYMENT_ID varchar(255),
      deploymentUnit text,
      state int4,
      updateDate timestamp,
      primary key (id)
      );

      alter table DeploymentStore add constraint UK_DeploymentStore_1 unique (DEPLOYMENT_ID);
      create sequence DEPLOY_STORE_ID_SEQ;

      ALTER TABLE ProcessInstanceLog ADD COLUMN processInstanceDescription varchar(255);
      ALTER TABLE RequestInfo ADD COLUMN owner varchar(255);
      ALTER TABLE Task ADD COLUMN description varchar(255);
      ALTER TABLE Task ADD COLUMN name varchar(255);
      ALTER TABLE Task ADD COLUMN subject varchar(255);

      -- update all tasks with its name, subject and description
      update task t set name = (select shorttext from I18NText where task_names_id = t.id);
      update task t set subject = (select shorttext from I18NText where task_subjects_id = t.id);
      update task t set description = (select shorttext from I18NText where task_descriptions_id = t.id);

      INSERT INTO AuditTaskImpl (activationTime, actualOwner, createdBy, createdOn, deploymentId, description, dueDate, name, parentId, priority, processId, processInstanceId, processSessionId, status, taskId)
      SELECT activationTime, actualOwner_id, createdBy_id, createdOn, deploymentId, description, expirationTime, name, parentId, priority,processId, processInstanceId, processSessionId, status, id
      FROM Task;
    4. Execute these scripts on your data base - NOTE: make sure that you execute these scripts as schema owner to avoid any permission violation issues one startup
  3. Remove jbpm console war file from your application server deployments folder WILDFLY_HOME/standalone/deployments
  4. Download wildfly distribution of the kie workbench for version 6.2.0.Final from here.
  5. Extract the war file into WILDFLY_HOME/standalone/deployments/jbpm-console.war
    1. You should have all files from the war file inside jbpm-console.war
  6. Configure persistence for jbpm console
    1. Edit WILDFLY_HOME/standalone/deployments/jbpm-console.war/WEB-INF/classes/META-INF/persistence.xmfile
    2. Change JNDI name for the data source
    3. Change the hibernate dialect for data base you use
  7. Create jbpm-console.war.dodeploy empty file inside WILDFLY_HOME/standalone/deployments directory - if not already there
That's pretty much all steps that are needed, but before you start the server let me provide you with some changes that are worth noting for 6.2 version that might impact the way it was used.
  • in 6.1 all deployment units that were active on the server were stored in system.git repository - which made it workbench specific and quite hidden - 6.2 comes with db based store for information about active deployments. With that, by default storage of deployment unit info are no more persisted into system.git. Though it can be enabled to be still stored in there by using system property: -Dorg.kie.git.deployments.enabled=true
  • in 6.1 all operations of Build & Deploy issued from Project Editor caused auto deploy to runtime which was not always desired, this can be disabled using system property: -Dorg.kie.auto.deploy.enabled=false
  • in 6.1 redeploy of same version (regardless if that was concrete version or snapshot) was by default allowed, in 6.2 concrete versions must be explicitly undeployed before they can be redeployed. This can be overridden by system property which will allow redeploy for all versions: -Dorg.kie.override.deploy.enabled=true
Now you can start your server and enjoy enhancements and bug fixes that jBPM 6.2 brings in.
 To do that go into WILDFLY_HOME/bin and issue following command:
./standalone.sh --server-config=standalone-full.xml

or for windows
./standalone.bat --server-config=standalone-full.xml

Hope it will be useful and as usually comments are more than welcome.

jBPM 6.2.0.Final released!

$
0
0
Last Friday (06.03.2015) jBPM 6.2.0.Final has been released.

It comes with large number of bug fixes and quite a list of new features, to name just few:

  • improved services layer that support various framework add ons
    • CDI
    • EJB
    • Spring
  • jbpm executor improvements and fixes to allow it to run time based reoccurring jobs and be executed in Spring environment
  • improved usability and stability of the KIE workbench application
  • Container support
    • JBoss EAP
    • Wildfly
    • Tomcat
    • WebSphere
    • Weblogic
  • and more that you can find here.
For bug fixes see change log (look at all versions that starts with 6.2.0...).

Let's get started with latest and greatest! ... in three steps


Step 1: Download

First you need to download it:

Step 2: Read and learn

Learn more about jBPM and it's various components by following latest version of documentation

Step 3: Try it

the best way to start is to follow jBPM installer chapter in documentation, but if you're already running jBPM 6.1 you can take a look at this article that provides you with some useful hints on installation and upgrade procedure.

Not only jBPM

At the same time Drools and Optaplanner 6.2.0.Final has been released as well. Checkout their web pages to learn more.

Asynchronous continuation in jBPM 6.3

$
0
0
It's been a while since release of 6.2.0.Final but jBPM is not staying idle, quite the opposite lots of changes are coming in. To give a quick heads up on a feature that has been requested many times - asynchronous continuation.

So what is that? Asynchronous continuation is all about allowing process designers to decide what activities should be executed asynchronously without any additional work required. Some might have already be familiar with async work item handlers that require commands to be given that will be carrying the actual work. While this is very powerful feature it requires additional coding - wrapping business logic in a command. Another drawback is flexibility - one could not easily change if work shall be executed synchronously on asynchronously.

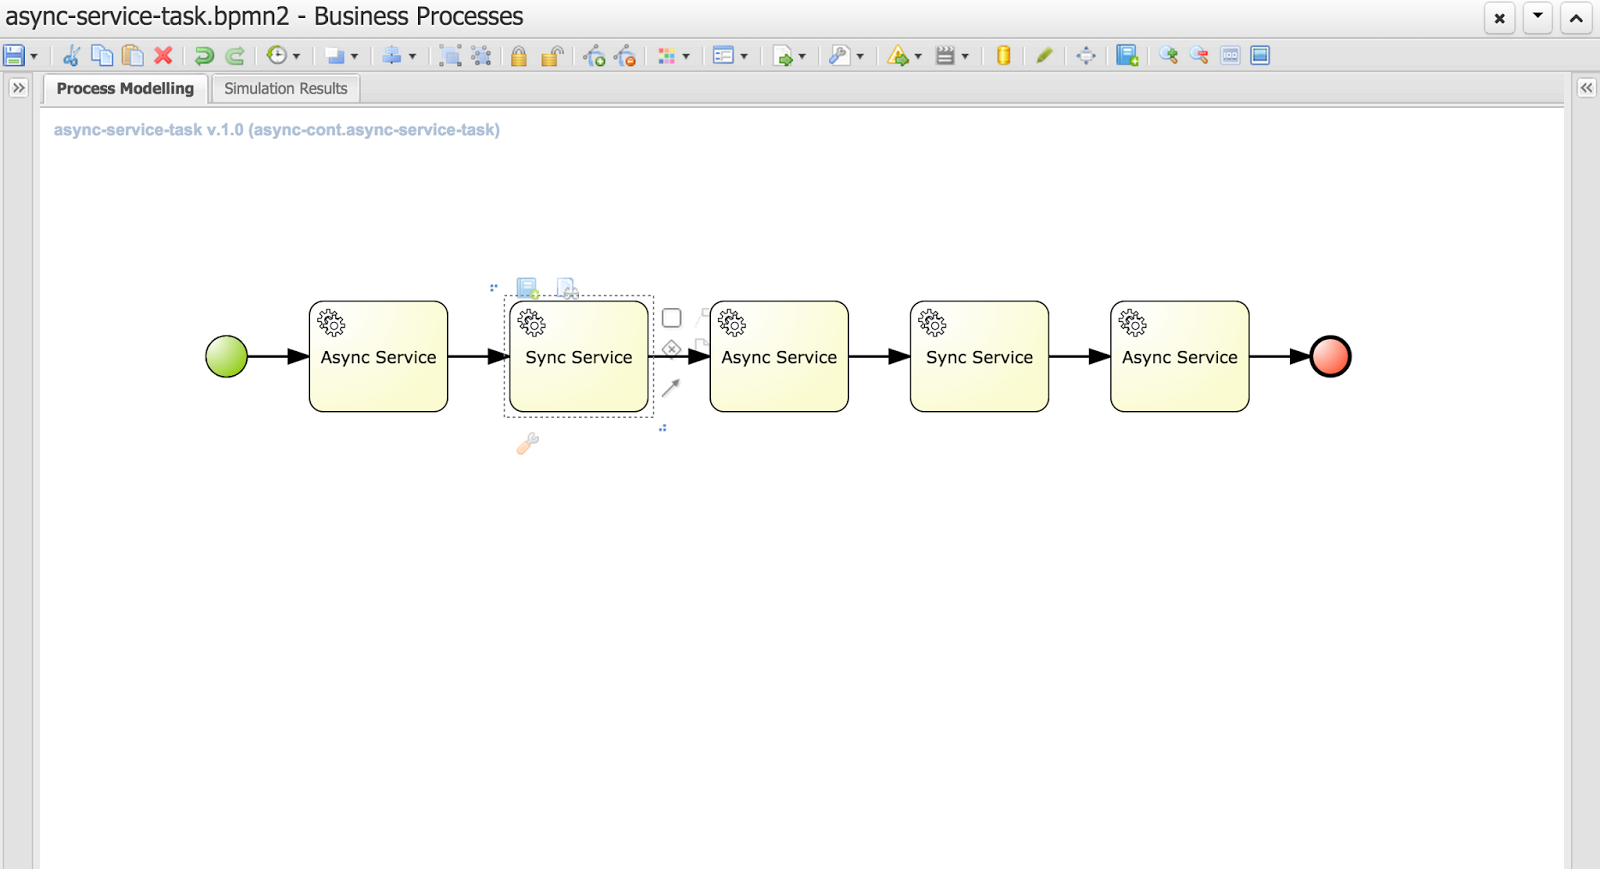
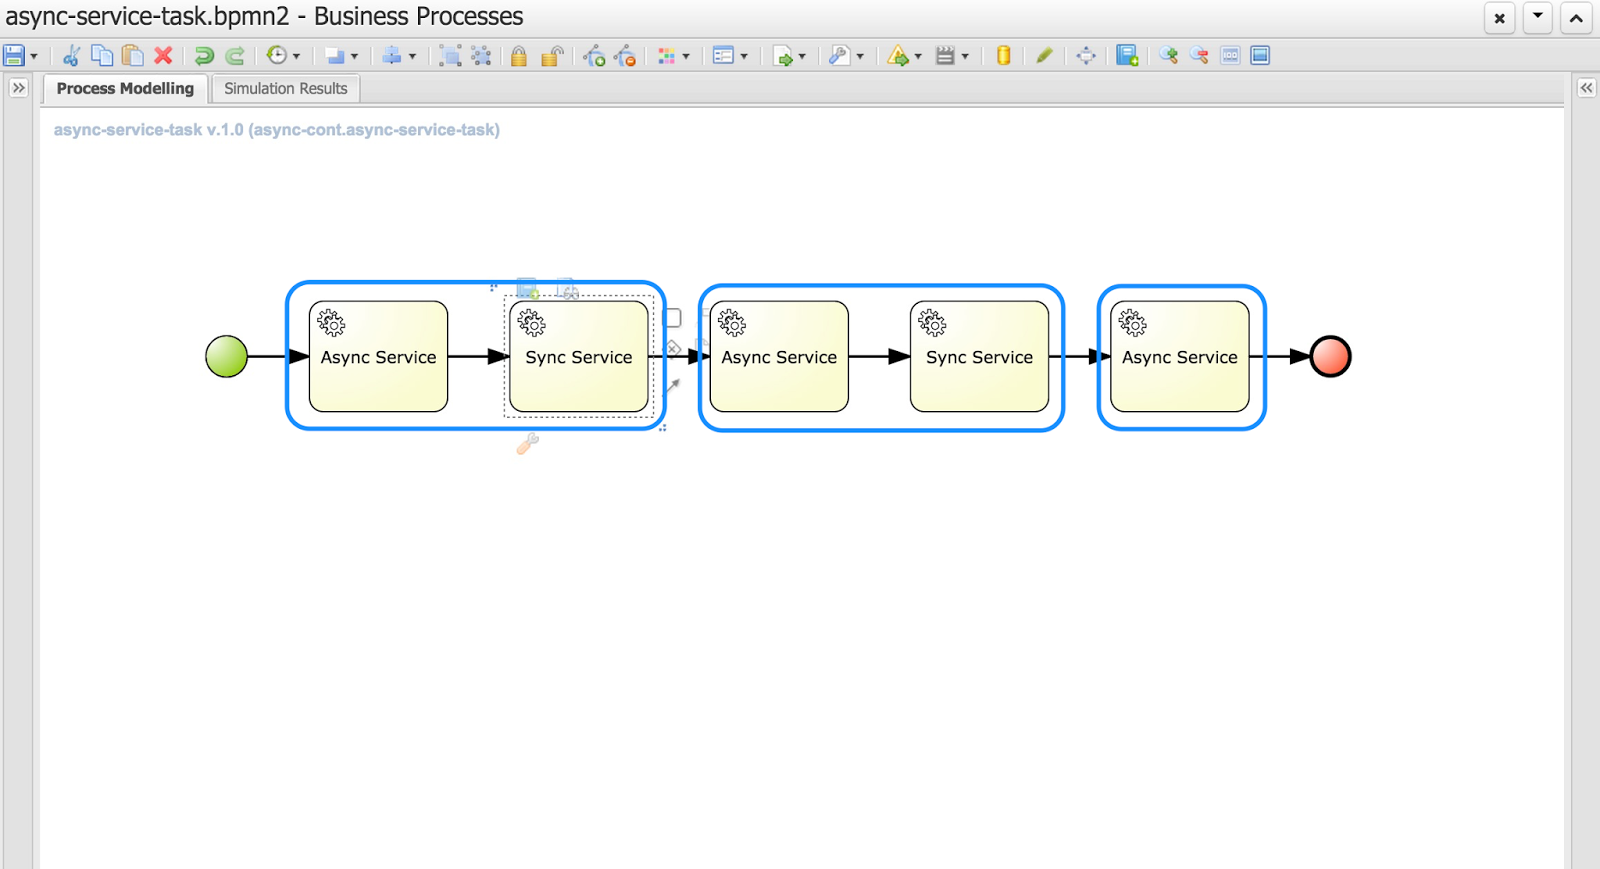
Nevertheless let's take a look at the evolution of that concept to allow users decide themselves what and when should be executed in the background. Let's take a quick look at simple process that is composed of service tasks

You can notice that this process has two types of tasks (look at their names):

  • Async service
  • Sync service
As you can imagine async service will be executed in background while Sync service will be executed on the same thread that its preceding node - so if the preceding node is async node sync node with directly follow it within same thread. 

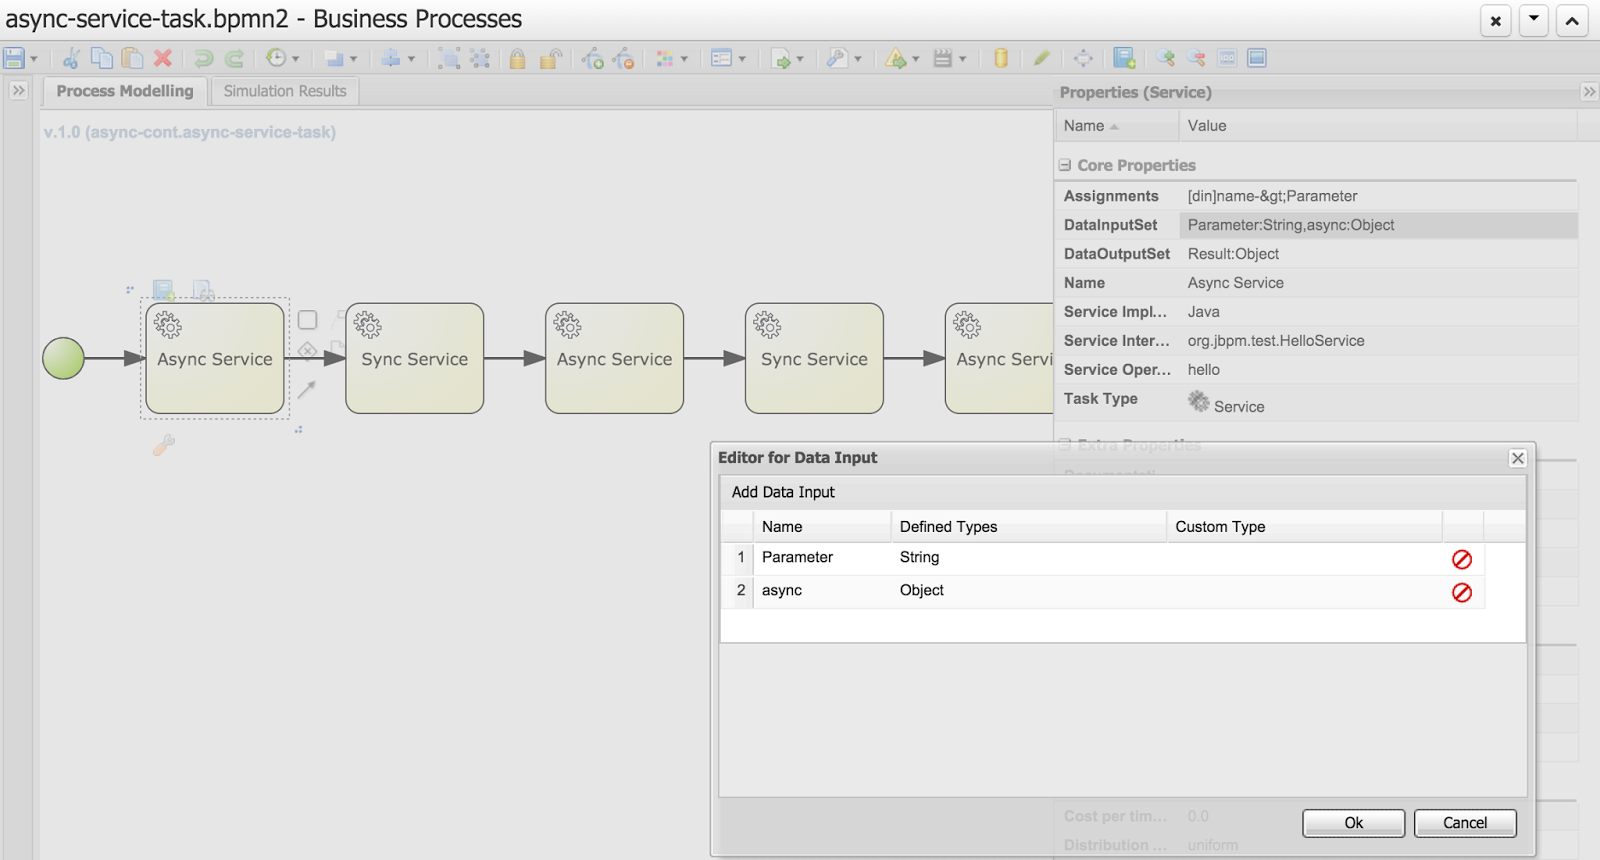
That's all clear and simple but then how do users define if the service task is async or sync? That's again simple - it's enough to define a dataInput on a task named 'async'
That is the key information to the engine with will inform it how to deal with given node.
Above is the configuration of an Async Service with defined 'async' data input. Next image shows the same configuration but for Sync Service
There is no 'async' dataInput defined.

Here is where I would like to ask for feedback if that way of defining async behavior of a node is sufficient? There is no general BPMN2 property for that behavior and extending BPMN2 xml with custom tags/attributes is not too good in my opinion. 
We could simplify that on editor level where user could simply use checkbox which would define dataInput for the user. All comments are welcome :)

So what will happen if we run this process?


// first async service followed directly by sync service (same thread id)
16:42:26,973 INFO (EJB default - 7) EJB default - 7 Service invoked with name john
16:42:26,977 INFO (EJB default - 7) EJB default - 7 Service invoked with name john

// first async service followed directly by sync service (same thread id)
16:42:29,958 INFO (EJB default - 9) EJB default - 9 Service invoked with name john
16:42:29,962 INFO (EJB default - 9) EJB default - 9 Service invoked with name john

// last async service
16:42:32,954 INFO (EJB default - 1) EJB default - 1 Service invoked with name john


If you look at the timestamps you will see that they match the default settings of jBPM executor - one async thread running every 3 seconds. These are of course configurable so you can fine tune it according to your requirements.

Each process instance of this process will be divided into three steps
Even though Service Tasks are synchronous by nature in BPMN2 with just single setting we can make them execute in background without any coding. 

Moreover, those of you who are already familiar with how jBPM works internally might noticed that these blue boxes actually represents transaction boundaries as well (well, not entirely as start and end node are part of transaction too). So with this we explored another advantage of this feature - possibility to easily define transaction scopes - meaning what nodes should be executed in single transaction. I believe that is another very important feature requested by many jBPM users.

Last but not least bit of technical details. This feature is backed by jBPM executor which is the backbone of asynchronous processing in jBPM 6. That means you need to have executor configured and running to be able to take advantage of this feature. 
If you run on jBPM console (aka kie workbench) there is no need to do anything, you're already fully equipped to do async continuation for all your process.
When you use jBPM in embedded mode there will be some additional steps required that depends on how you utilize jBPM API.
  1. Direct use of KIE API (KieBase and KieSession) - here you need to configure ExecutorService and add it to kieSession environment under "ExecutorService" key. Once it's there it will process the nodes async way
  2. RuntimeManager API - similar to KIE API though you should add ExecutorService as one of environment entires when setting up RuntimeEnvironment
  3. jBPM services API - you need to add ExecutorService as attribute of DepoymentService, if you use CDI or EJB that will be injected automatically for you (assuming all dependencies are available to the container)
This feature is available for:
  • all task types (service, send, receive, business rule, script, user task)
  • subprocesses (embedded and reusable)
  • multi instance task and subprocess

But what happens if user mark node as async but there is no ExecutorService available? Process will still run but will report warning in the log and proceed with nodes as synchronous execution. So it's safe to model your process definition in async way even if there is no async behavior available (yet)

Hope you will like this feature and don't hesitate to leave some comments with feedback and ideas! 

P.S.
This feature is currently on jBPM master and scheduled to go out with 6.3, so if you would like to try it take the latest nightly build or build jBPM from source.

More to come with jBPM so stay tuned...

jBPM talk at JBCNConf- polyglot and reactive jBPM

$
0
0
With recent trend to move to lightweight, container-less runtime environments, jBPM to prove it does not stand out from this approach came up with integration with Vert.x (2.x). This integration is to show users how to move towards reactive, event driven application without a need to run on any container but still use BPM capabilities.

So if you're interested how this looks like join as at JBCNConf - Barcelona, 26 - 27 June / 2015.

Together with Mauricio "Salaboy" Salatino we are going to introduce you to "Polyglot and reactive jBPM". This talk is intended for developers to give basic information about both jBPM and Vert.x and how they work together.
As part of the talk (actually bigger part of the talk) we will perform live demo that will illustrate:

  • jBPM as vert.x module
  • running jBPM projects (aka kjars) inside vert.x instance - one kjar one instance
  • use of clustered vert.x event bus to exchange information between jBPM projects on runtime
  • integration with KIE workbench to prove you can combine these two without affecting each other
  • use of different languages (Java, JavaScript, Groovy, Scala, Ceylon)  to interact with jBPM running on vert.x
So come and join us to see jBPM and Vert.x in action!

Shift gears with jBPM executor

$
0
0
Since version 6.0 jBPM comes with component called jBPM executor that is responsible for carrying on with background (asynchronous) tasks. It started to be more and more used with release of 6.2 by users and even more with coming 6.3 where number of enhancements are based on that component:

  • async continuation 
  • async throw signals
  • async start process instance
jBPM executor uses by default a polling mechanism with backend data base that stores jobs to be executed. There are couple of reasons to use that mechanism:
  • supported on any runtime environment (application server, servlet container, standalone)
  • allows to decouple requesting the job from executing the job
  • allows configurable retry mechanism of failed jobs
  • provides search API to look through available jobs
  • allows to schedule jobs instead of being executed immediately 
Following is a diagram illustrating a sequence of events that describe default (polling based) mechanism of jBPM executor (credits for creating this diagram go to Chris Shumaker)
Executor runs in sort of event loop manner - there is one or more threads that constantly (on defined intervals) poll the data base to see if there are any jobs to be executed. If so picks it and delegates for execution. The delegation differs between runtime environments:
  • environment that supports EJB - it will delegate to ejb asynchronous method for execution
  • environment that does not support EJB will execute the job in the same thread that polls db
This in turn drives the configuration options that look pretty much like this:
  • in EJB environment usually single thread is enough as it is used only for triggering the poll and not actually doing the poll, so number of threads should be kept to minimum and the interval should be used to fine tune the speed of processing of async jobs
  • on non EJB environment number of threads should be increased to improve processing power as each thread will be actually doing the work
In both cases users must take into account the actual needs for execution as the more threads/more frequent polls will cause higher load on underlying data base (regardless if there are jobs to execute or not). So keep that in mind when fine tuning the executor settings.

So while this fits certain set of use cases it does not scale well for systems that require high throughput in distributed environment. Huge number of jobs to be executed as soon as possible requires more robust solution to actually cope with the load in reasonable time and with not too heavy load on underlaying data base. 
This came us to enhancement that allows much faster (and immediate compared to polling) execution, and yet still provide same capabilities as the polling:
  • jobs are searchable 
  • jobs can be retried
  • jobs can be scheduled
The solution chosen for this is based on JMS destination that will receive triggers to perform the operations. That eliminates to poll for available jobs as the JMS provider will invoke the executor to process the job. Even better thing is that the JMS message carries only the job request id so the executor will fetch the job from db by id - the most efficient retrieval method instead of running query by date.
JMS allows clustering support and fine tuning of JMS receiver sessions to improve concurrency. All in standard JEE way. 
Executor discovers JMS support and if available will use it (all supported application servers) or fall back to default polling mechanism.

NOTE: JMS is only supported for immediate job requests and not the scheduled one

Polling mechanism is still there as it's responsibility is still significant:
  • deals with retries
  • deals with scheduled jobs
Although need for the high throughput on polling is removed. That means that users when using JMS should consider to change the interval of polls to higher number like every minute instead of every 3 seconds. That will reduce the load on db but still provide very performant execution environment.

Next article will illustrate the performance improvements when using the JMS based executor compared with default polling based. Stay tuned and comments as usually are more than welcome.


Asynchronous processing with jBPM 6.3

$
0
0
As described in previous article, jBPM executor has been enhanced to provide more robust and powerful execution mechanism for asynchronous tasks. That is based on JMS. So let's take a look at the actual improvements by bringing this into the real process execution.

The use case is rather simple to understand but puts quite a load on the process engine and asynchronous execution capabilities.

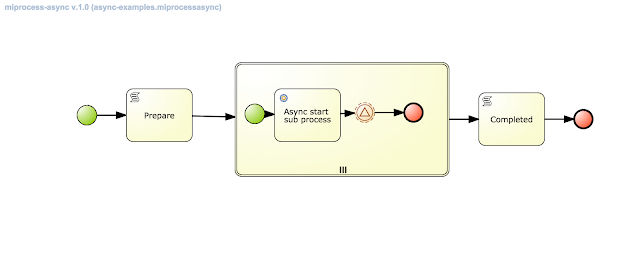
  • main process that uses multi instance subprocess to create another process instance to carry additional processing and then awaits for for signal informing about completion of the child process
    • one version that uses Call Activity to start sub process
    • another that uses AsyncStartProcess command instead of Call Activity
  • sub process that has responsibility to execute a job in asynchronous fashion

Main process with call activity to start sub process


Main process with async start process task to start subprocess
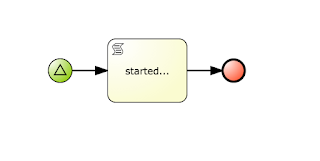
Sub process that is invoked from the main process
So what we have here and what's the difference between two main process versions:

  • main process will create as many new process instances as given in collection that is an input to multi instance subprocess - that is driven by process variable that user needs to provide on main process start
  • then in one version to create new process instance as part of multi instance it will use Call Activity BPMN2 construct to create process - that is synchronous way
  • in the second version, on the other hand, multi instance will use Async Start Process command (via async task) to start process instance in asynchronous way
While these two achieve pretty much the same they do differ quite a lot. First of all, using Call Activity will result in following:
  • main process instance will not finish until all sub process instances are created - depending on number of them might be millisecond or seconds or even minutes (in case of really huge set of sub process instances)
  • creation of main process and sub process instances are done in single transaction - all or nothing so if one of the subprocess fails for whatever reason all will be rolled back including main process instance
  • it takes time to commit all data into data base after creating all process instances - note that each process instance (and session instance when using per process instance strategy) has to be serialized using protobuf and then send to db as byte array, and all other inserts as well (for process, tasks, history log etc). That all takes time and might exceed transaction timeout which will cause rollback again...
When using async start process command the situation is slightly different:
  • main process instance will wait only for creating job requests to start all subprocess instances, this is not really starting any process instance yet
  • rollback will affect only main process instance and job requests, meaning it is still consistent as unless main process is committed no sub process instances will be created
  • subprocess instances are started independently meaning a failure of one instance does not affect another, moreover since this is async job it will be retried and can actually be configured to retry with different delays
  • each sub process instance is carried within own transaction which is much smaller and finishes way faster (almost no risk to encounter transaction timeouts) and much less data to be send to data base - just one instance (and session in case of per process instance strategy)

That concludes the main use case here. Though there is one additional that in normal processing will cause issues - single parent process instance that must be notified by huge number of child process instances, and that can happen at pretty much same time. That will cause concurrent updates to same process instance which will result in optimistic lock exception (famous StaleObjectStateException). That is expected and process engine can cope with that to some extent - by using retry interceptor in case of optimistic lock exceptions. Although it might be too many concurrent updates that some of them will exceed the retry count and fail to notify the process instance. Besides that each such failure will cause errors to be printed to logs and by that can reduce visibility in logs and cause some alerts in production systems.

So how to deal with this?
Idea is to skip the regular notification mechanism that directly calls the parent process instance to avoid concurrent updates and instead use signal events (catch in main process instance and throw in subprocess instance).
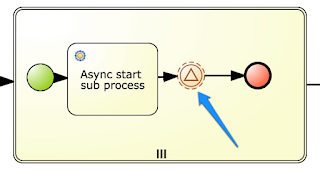
Main process catch signal intermediate event
Sub process throw signal end event
But use of signal catch and throw events does not solve the problem by itself. The game changer is the scope of the throw event that allows to use so called 'External' scope that utilizes JMS messaging to deliver the signal from the child to parent process instance. Since main process instance uses multi instance subprocess to create child process instances there will be multiple (same number as sub process instances) catch signal events waiting for the notification.
With that signal name cannot be same like a constant as first signal from sub process instance would trigger all catch events and by that finish multi instance too early.

To support this case signal names must be dynamic - based on process variable. Let's enumerate of 
the steps these two processes will do when being executed:
  • main process: upon start will create given number of subprocess that will call new process instance (child process instance)
  • main process: upon requesting the sub process instance creation (regardless if it's via call activity or async task) it will pass signal name that is build based on some constant + unique (serialized-#{item}) items that represents single entry from multi instance input collection
  • main process: will then move on to intermediate catch signal event where name is again same as given to sub process (child) and await it (serialized-#{item})
  • sub process: after executing the process it will throw an event via end signal event with signal name given as input parameter when it was started (serialized-#{item}) and use external scope so it will be send via JMS in transactional way - delivered only when subprocess completes (and commits) successfully

External scope for throw signal events is backed by WorkItemHandler for plug-ability reasons so it can be realized in many ways, not only the default JMS way. Although JMS provides comprehensive messaging infrastructure that is configurable and cluster aware. To solve completely the problem - with concurrent updates to the parent process instance - we need to configure receiver of the signals accordingly. The configuration boils down to single property - activation specification property that limits number of sessions for given endpoint.
In JBoss EAP/Wildfly it can be given as simple entry on configuration of MDB defined in workbench/jbpm console:

In default installation the signal receiver MDB is not limiting concurrent processing and looks like this (WEB-INF/ejb-jar.xml):

  <message-driven>
    <ejb-name>JMSSignalReceiver</ejb-name>
    <ejb-class>org.jbpm.process.workitem.jms.JMSSignalReceiver</ejb-class>
    <transaction-type>Bean</transaction-type>
    <activation-config>
      <activation-config-property>
        <activation-config-property-name>destinationType</activation-config-property-name>
        <activation-config-property-value>javax.jms.Queue</activation-config-property-value>
      </activation-config-property>
      <activation-config-property>
        <activation-config-property-name>destination</activation-config-property-name>
        <activation-config-property-value>java:/queue/KIE.SIGNAL</activation-config-property-value>
      </activation-config-property>
    </activation-config>
  </message-driven>
To enable serialized processing that MDB configuration should look like this:

 <message-driven>
   <ejb-name>JMSSignalReceiver</ejb-name>
   <ejb-class>org.jbpm.process.workitem.jms.JMSSignalReceiver</ejb-class>
   <transaction-type>Bean</transaction-type>
   <activation-config>
      <activation-config-property>
        <activation-config-property-name>destinationType</activation-config-property-name>
        <activation-config-property-value>javax.jms.Queue</activation-config-property-value>
      </activation-config-property>
      <activation-config-property>
        <activation-config-property-name>destination</activation-config-property-name>
        <activation-config-property-value>java:/queue/KIE.SIGNAL</activation-config-property-value>
      </activation-config-property>
      <activation-config-property>
        <activation-config-property-name>maxSession</activation-config-property-name>
        <activation-config-property-value>1</activation-config-property-value>
      </activation-config-property> 
    </activation-config>
  </message-driven>

That ensure that all messages (even if they are sent concurrently) will be processed serially. By that notifying the parent process instance in non concurrent way ensuring that all notification will be delivered and will not cause conflicts - concurrent updates on same process instance.

With that we have fully featured solution that deals with complex process that requires high throughput with asynchronous processing. So now it's time to see what results we can expect from execution and see if different versions of main process differ in execution times.

Sample execution results

Following table represents sample execution results of the described process and might differ between different environments although any one is more than welcome to give it a try and report back how it actually performed.


100 instances300 instances500 instance
Call Activity with JMS executor7 sec24 sec41 sec
Async Start Task with JMS executor4 sec21 sec28 sec
Call Activity with polling executor (1 thread, 1 sec interval)1 min 44 sec5 min 11 sec8 min 44 sec
Async Start Task with polling executor (1 thread, 1 sec interval)3 min 21 sec10 min17 min 42 sec
Call Activity with polling executor (10 threads, 1 sec interval)17 sec43 sec2 min 13 sec
Async Start Task with polling executor (10 threads, 1 sec interval)"20 sec1 min 2 sec1 min 41 sec

Conclusions:

as you can see, JMS based processing is extremely fast compared to polling based only. In fact the fastest is when using async start process command for starting child process instances. The difference increases with number of sub process instances to be created.
From the other hand, using polling based executor only with async start process command is the slowest, and that is expected as well, as all start process commands are still handled by polling executor which will not run fast enough. 
In all the cases the all processing completed successfully but the time required to complete processing differs significantly. 


If you're willing to try that yourself, just downloaded 6.3.0 version of jBPM console (aka kie-wb) and then clone this repository into your environment. Once you have that in place go to async-perf project and build and deploy it. Once it's deployed successfully you can play around with the async execution:
  • miprocess-async is the main process that uses async start process command to start child process instance
  • miprocess is the main process that uses call activity to start child process instances
In both cases upon start you'll be asked for number of subprocesses to create. Just pick a number and run it!

Note that by default the JMS receiver will receive signals concurrently so unless you reconfigure it you'll see concurrent updates to parent process failing for some requests.

Have fun and comments and results reports welcome


Improved signaling in jBPM 6.3

$
0
0
One of the very powerful features of BPMN2 is signaling. It is realized by throw (send signal) and catch (receive signal) constructs. Depending on which type of signal we need it can be used in different places in the process:

  • throw events
    • intermediate event
    • end event
  • catch events
    • start event
    • intermediate event
    • boundary event

It is powerful as is, but it has been enhanced in jBPM 6.3 in two areas:
  • introduction of signal scopes for throwing events
  • support for parameterized signal names - both throw and catch signal events

Signal scopes

Signals by default rely on process engine (ksession) signaling mechanism that until version 6.3 has been scoped only to the same ksession instance meaning it was not able to signal properly things outside of given ksession. This was especially visible when using strategy different than singleton e.g. per process instance. 
Version 6.3 is equipped with predefined scopes to eliminate this problem and further provide fine grained control over what is going to be signaled.

NOTE: signal scopes apply only to throw events.

  • process instance scope - is the lowest in the hierarchy of scopes that narrows down the signal to given process instance. That means only catch events within same process instance will be singled, nothing outside of process instance will be affected
  • default (ksession) scope - same as in previous versions (and thus called default) that signals only elements known to ksession - behavior will vary depending on what strategy is used 
    • singleton - will signal all instances available for this ksession
    • per request - will signal only currently processed process instance and those with start signal events
    • per process instance - same as per request - will signal only currently processed process instance and those with start signal events
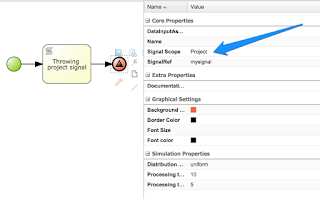
  • project scope - will signal all active process instances of given deployment and start signal events (regardless of the strategy)
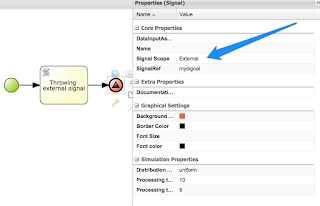
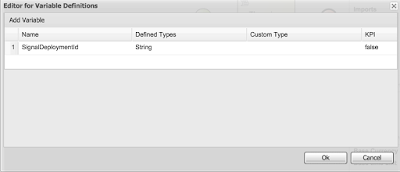
  • external scope - allows to signal both project scope way and cross deployments - for cross deployments it requires to have a process variable called 'SignalDeploymentId' that provides information about what deployment/project should be the target of the signal. It was done on purpose to provide deployment id as doing overall broadcast would have negative impact on performance in bigger environments

To illustrate this with an example let's consider few very simple processes:
  • starting up with those that will receive signals - here there is no difference
Intermediate catch signal event

Start signal event

  • next those that will throw events with different scopes

Process instance scoped signal

Default (ksession) scoped signal
Project  scoped signal

External scoped signal
Process instance, default and project does not require any additional configuration to work properly, though external does. This is because external signal uses work item handler as a backend to allow pluggable execution (out of the box jBPM comes with one that is based on JMS). It does support both queue and topic although it is configured with queue in jbpm console/kie workbench.
So to be able to use external signal one must register work item handler that can deal with the external signals. One that comes with jBPM can be easily registered via deployment descriptor (either on server level or project level)
Registered External Send Task work item handler for external scope signals

Some might ask why it is not registered there by default - and the reason is that jBPM supports multiple application servers and all of them deal with JMS differently - mainly they will have different JNDI names for queues and connection factories.
JMS based work item handler supports that configuration but requires to specify these JNDI look up names when registering handler.
As illustrated on above screenshot, when running on JBoss AS/EAP/Wildfly you can simply register it via mvel resolver with default (no arg) constructor and it will pick up the preconfigured queue (queue/KIE.SIGNAL) and connection factory (java:/JmsXA). For other cases you need to specify JNDI names as constructor arguments:

new org.jbpm.process.workitem.jms.
JMSSendTaskWorkItemHandler("jms/CF", "jms/Queue")

Since external signal support cross project signals it does even further than just broadcast. It allows to give what project needs to be signaled and even what process instance within that project. That is all controlled by process variables of the process that is going to throw a signal. Following are supported:
  • SignalProcessInstanceId - target process instance id
  • SignalDeploymentId - target deployment (project)

Both are optional and if not given engine will consider same deployment/project as the process that throws the signal, and broadcast in case of missing process instance id. When needed it does allow fine grained control even in cross project signaling.
declared SignalDeploymentId process variable for external scope signal

You can already give it a try yourself by cloning this repo and working with these two projects:

  • single-project - contains all process definitions that working with same project
  • external-project - contains process definition that uses external scope signal (includes a form to enter target deployment id)
But what are the results with these sample process??
  • When using process that signals only with process instance scope (process id: single-project.throw-pi-signal) it will only signal event based subprocess included in the same process definition nothing else
  • When using process that signals with default scope (process id: single-project.throw-default-signal) it will start a process (process id: single-project.start-with-signal) as it has signal start event (regardless of what strategy is used) but will not trigger process that waits in intermediate catch event for other strategies than singleton
  • When using process that signals with project scope (process id: single-project.throw-project-signal) it will start a process (process id: single-project.start-with-signal) as it has signal start event and will trigger process that waits in intermediate catch event (regardless of what strategy is used)
  • When using process that signals with external scope (process id: external-project.throw-external-signal) it will start a process (process id: single-project.start-with-signal) as it has signal start event and will trigger process that waits in intermediate catch event (regardless of what strategy is used) assuming the SignalDeploymentId was set to org.jbpm.test:single-project:1.0.0-SNAPSHOT on start of the process

Parameterized signal names

another enhancement on signals in jBPM 6.3 is to allow signal names to be parameterized. That means you don't have to hardcode signal names in process definition but simply refer to them by process variables. 
That gives extremely valuable approach to dynamically driven process definitions that allow to change the signal it throw or catches based on the state of process instance.

One of the use cases that is needed is when multi instance is used and we want individual instances to react to different signals.

Simply refer to it via variable expression as already supported in data input and outputs, user task assignments etc.

#{mysignalVariable}

then make sure that you define mysignalVariable variable in your process and it has a value before it enters the signal event node.

And that's it for now, stay tuned for more news about jBPM 6.3 that is almost out the door.

Unified KIE Execution Server - Part 1

$
0
0
This blog post initiates the series of articles about KIE Execution Server and its capabilities provided in version 6.3. Here is a short description of what you can expect:

  1. Introduction to KIE Execution Server and installation notes
  2. Use of KIE Server Client to interact with KIE Execution Server
  3. KIE Execution Server managed vs unmanaged
  4. KIE Execution Server with non java clients
  5. KIE Execution Server clustering/scalability
These are just starting points as more articles most likely will follow depending on interest ... so let's start with first and foremost - the introduction and installation

KIE Execution Server introduction


In version 6.2 KIE Execution Server has been released that was targeting Drools users to provide out of the box execution environment that is accessible via REST and JMS interface. It was designed to be standalone and lightweight component that can be deployed to either application servers or web containers (with obvious limitation - no JMS on web containers).

As it proved to be a valid option as a standalone component that can be easily deployed and scaled, in version 6.3 there will be so called unified KIE Execution Server that will bring in more capabilities to the end users:

  • BRM capability that is what was in 6.2 providing rules execution
  • BPM capability that brings jBPM into the picture
    • process execution
    • task execution
    • asynchronous jobs execution
All of these are provided in unified way and exposed via REST and JMS interfaces. On top of it a KIE Server Client is delivered that makes use of this server very easy in java environment.
The unification means that from end user point of view you will not have to switch between different servers to take advantage of rule or process execution, same client can be used to perform both and so on. Unified terminology was used as well to not confuse users and thus here comes the most important parts:
  • server - is the actual instance of the execution server
  • container - is execution representation of the kjar/KieContainer that can be composed of various assets (rules, processes, data model, etc) - there can be multiple containers on single server
  • process - business process definition available in given container - can be many per container
  • task - user task definition available in given container - can be many per container
  • job - asynchronous job that is/was scheduled in the execution server
  • query - predefined set of queries to retrieve data out from the execution server

NOTE: Very important note to take into account is that all operations that modify data like:
  • insert fact
  • fire rules
  • start process
  • complete task
must always be referenced via container to guarantee all configuration to be properly set - class loader for custom data, handlers, listeners being registered in time etc.
While access to read only data like queries is simplified and expects the minimum set of data to be given to find details. E.g. get process instance - requires only process instance id as by that it will be able to find it and will return all the details required to perform operations on it - including container id (same goes for tasks etc).

Installation

Let's start with standalone mode running on Wildfly 8.1.0.Final (8.1.0 is used as it was tested with both kie server and kie workbench so better stick to just one version of the application server at the beginning :))

So we have to start with downloading Wildfly distribution and unzipping it to desired location - referred as WILDFLY_HOME. Here we start with configuration:
  • create user in application realm 
    • name: kieserver 
    • password: kieserver1!
    • roles: kie-server
NOTE: these are the defaults that can be changed but if you decide to change them you'll need to provide changed values via system properties upon server startup. So for the sake of simplicity let's start with defaults.
To add user you can use add-user.sh (or add-user.bat on windows) script that comes with Wildfly distribution. Just go to WILDFLY_HOME/bin and invoke add-user script:
  • next download EE7 version of kie execution server 6.3.0 version from here
  • downloaded version shall be copied to WILDFLY_HOME/standalone/deployments
    • personally I usually change the name of the war file to not include version and classifier as it will be used as context path of the deployed application making all urls much longer
    • so optionally you can rename the war file to short version like kie-server.war
We are almost ready to start, last thing is to prepare set of system properties that we will use to start our server with fully featured environment:
  • first of all we must start wildfly server with full profile that activates JMS support
    • --server-config=standalone-full.xml
  • optionally, though useful when we have many wildfly instances running on same machine, let's specify port offset for wildfly server
    • -Djboss.socket.binding.port-offset=150
  • next we give the kie server instance and identifier - it's optional as if not given it will generate one, though it will be less human readable so let's give it a name
    • -Dorg.kie.server.id=first-kie-server
  • let specify the url location that our kie server will be accessible - this is important when running in managed mode (see part 3 of this series) but it's a good practice to give it always
    • -Dorg.kie.server.location=http://localhost:8230/kie-server/services/rest/server
with that we are ready to launch our kie server in standalone mode, use this command from WILDFLY_HOME/bin:

./standalone.sh  
--server-config=standalone-full.xml 
-Djboss.socket.binding.port-offset=150 
-Dorg.kie.server.id=first-kie-server 
-Dorg.kie.server.location=http://localhost:8230/kie-server/services/rest/server

Once application server (and application) starts you should be able to issue simple GET request to the server using the org.kie.server.location url to get information about running server:
When opening this page you will be prompted for user name and password, use the one you created in the beginning of installation process - kieserver with password kieserver1!

So we have kie server up and running with following capabilities:
  • KieServer - this is always present as it provides deployment operations to be able to deploy/undeploy containers on kie server instance
  • BRM - rules execution
  • BPM - process, tasks and jobs execution
Version of the kie server is also available (in this case is 6.4.0-SNAPSHOT as already running on latest master version - though at the time of writing this 6.3.0 is exactly the same)

Unified kie server is built on top of extensions aka capabilities and they can be turned on or off via system properties if one does not need some:
  • -Dorg.drools.server.ext.disabled=true - to disable BRM extension
  • -Dorg.jbpm.server.ext.disabled=true - to disable BPM extension
When disabling BPM extension you will see lot less things being bootstrapped upon  server start - no persistence is involved. So let's disable BPM capability, simply shutdown the server and start it with following command:
./standalone.sh  
--server-config=standalone-full.xml 
-Djboss.socket.binding.port-offset=150 
-Dorg.kie.server.id=first-kie-server 
-Dorg.kie.server.location=http://localhost:8230/kie-server/services/rest/server
-Dorg.jbpm.server.ext.disabled=true

watch the server startup logs and then issue the same url request as previously to see the server info response:
As you can see there is no BPM capabilities any more that means any attempt to contact any of the REST/JMS api that belong to BPM will fail.

Let's get back to fully featured KIE Execution Server and deploy container to it and run some simple process to verify it does work.
To do so, I'll use REST client in Firefox that allows to execute any HTTP method towards given endpoint. So we start with creating/deploying container to running KIE Execution Server

Endpoint:
  • http://localhost:8230/kie-server/services/rest/server/containers/hr
  • where hr is the name of the container
Method:
  • PUT
Request body:
<?xml version="1.0" encoding="UTF-8" standalone="yes"?>
<kie-container container-id="hr">
    <release-id>
        <group-id>org.jbpm</group-id>
        <artifact-id>HR</artifact-id>
        <version>1.0</version>
    </release-id>
</kie-container>

this is one of the standard example project that comes with every version of jBPM and it's part of jbpm-playground repository. Make sure it was built at least once and is available in maven repository that your server has access to or is in your local maven repo (usually at ~/.m2/reporitory)


When request is finished successfully you should see following response being returned:


That tells us we have single container deployed and it is in status STARTED - meaning ready to accept and process requests. So let's see if it actually is ready...

First let's see what processes do we have available there
Endpoint:
  • http://localhost:8230/kie-server/services/rest/server/queries/processes/definitions
Method:
  • GET

When successfully executed you should find single process being available with process if hiring inside container id hr


That tells us we have some processes to be executed, so let's create one instance of hiring process with some process variables

Endpoint:
  • http://localhost:8230/kie-server/services/rest/server/containers/hr/processes/hiring/instances
  • where hr is the name of the container and hiring is the process id
Method:
  • POST
Request body:
<?xml version="1.0" encoding="UTF-8" standalone="yes"?>
<map-type>
    <entries>
        <entry>
            <key>age</key>
            <value xsi:type="xs:int" xmlns:xs="http://www.w3.org/2001/XMLSchema" xmlns:xsi="http://www.w3.org/2001/XMLSchema-instance">25</value>
        </entry>
        <entry>
            <key>name</key>
            <value xsi:type="xs:string" xmlns:xs="http://www.w3.org/2001/XMLSchema" xmlns:xsi="http://www.w3.org/2001/XMLSchema-instance">john</value>
        </entry>
    </entries>
</map-type>

So let's issue the start process request...

And examine response...


As we can see we have successfully created process instance of hiring process and the returned process instance id is 1.

As last verification step let's list active process instances available on our kie server instance
Endpoint:
  • http://localhost:8230/kie-server/services/rest/server/queries/processes/instances
Method:
  • GET


So that's all for the first article, introducing unified KIE Execution Server and it's first steps - installation and verification if it actually works. Stay tuned for more coming ... a lot more :)

Unified KIE Execution Server - Part 2

$
0
0
This blog post is continuation of the first of the series about KIE Execution Server. In this article KIE Server Client will be introduced and used for basic operations on KIE Execution Server.

In the first part, we have went through the details of installation on Wildfly and verification with simple REST client to show it's actually working. This time we do pretty much the same verification although we expand it with further operations and make it via KIE Server Client instead.

So let's get started. We are going to use same container project (hr - org.jbpm:HR:1.0) that includes hiring process, that process has set of user tasks that we will be creating and working with. To be able to work on tasks our user (kieserver) needs to be member of the following roles used by the hiring process:

  • HR
  • IT
  • Accounting
So to add these roles to our user we again use add-user script that comes with wildfly to simply update already existing user


NOTE: don't forget that kieserver user must have kie-server role assigned as well.

With that we are ready to start the server again

KIE Server Client

KIE Server Client is a lightweight library that custom application can use to interact with KIE Execution Server when is written in Java. That library extremely simplifies usage of the KIE Execution Server and make it easier to migrate between versions because it hides all internals that might change between versions. 

To illustrate that it is actually lightweight here is the list of dependencies needed on runtime to execute KIE Server Client


[INFO]
[INFO] --- maven-dependency-plugin:2.8:tree (default-cli) @ kie-server-client ---
[INFO] org.kie.server:kie-server-client:bundle:6.3.0-SNAPSHOT
[INFO] +- org.kie:kie-api:jar:6.3.0-SNAPSHOT:compile
[INFO] +- org.kie:kie-internal:jar:6.3.0-SNAPSHOT:compile
[INFO] +- org.kie.server:kie-server-api:jar:6.3.0-SNAPSHOT:compile
[INFO] | +- org.drools:drools-core:jar:6.3.0-SNAPSHOT:compile
[INFO] | | +- org.mvel:mvel2:jar:2.2.6.Final:compile
[INFO] | | \- commons-codec:commons-codec:jar:1.4:compile
[INFO] | +- org.codehaus.jackson:jackson-core-asl:jar:1.9.9:compile
[INFO] | +- com.thoughtworks.xstream:xstream:jar:1.4.7:compile
[INFO] | | +- xmlpull:xmlpull:jar:1.1.3.1:compile
[INFO] | | \- xpp3:xpp3_min:jar:1.1.4c:compile
[INFO] | \- org.apache.commons:commons-lang3:jar:3.1:compile
[INFO] +- org.jboss.resteasy:jaxrs-api:jar:2.3.10.Final:compile
[INFO] | \- org.jboss.logging:jboss-logging:jar:3.1.4.GA:compile
[INFO] +- org.kie.remote:kie-remote-common:jar:6.3.0-SNAPSHOT:compile
[INFO] +- org.codehaus.jackson:jackson-xc:jar:1.9.9:compile
[INFO] +- org.codehaus.jackson:jackson-mapper-asl:jar:1.9.9:compile
[INFO] +- org.slf4j:slf4j-api:jar:1.7.2:compile
[INFO] +- org.jboss.spec.javax.jms:jboss-jms-api_1.1_spec:jar:1.0.1.Final:compile
[INFO] +- com.sun.xml.bind:jaxb-core:jar:2.2.11:compile
[INFO] \- com.sun.xml.bind:jaxb-impl:jar:2.2.11:compile


So let's setup a simple maven project that will use KIE Server Client to interact with the execution server

<project xmlns:xsi="http://www.w3.org/2001/XMLSchema-instance" xmlns="http://maven.apache.org/POM/4.0.0" xsi:schemalocation="http://maven.apache.org/POM/4.0.0 http://maven.apache.org/xsd/maven-4.0.0.xsd">
<modelversion>4.0.0</modelversion>
<groupid>org.jbpm.test</groupid>
<artifactid>kie-server-test</artifactid>
<version>0.0.1-SNAPSHOT</version>

<dependencies>
<dependency>
<groupid>org.kie</groupid>
<artifactid>kie-internal</artifactid>
<version>6.3.0-SNAPSHOT</version>
</dependency>
<dependency>
<groupid>org.kie.server</groupid>
<artifactid>kie-server-client</artifactid>
<version>6.3.0-SNAPSHOT</version>
</dependency>
<dependency>
<groupid>ch.qos.logback</groupid>
<artifactid>logback-classic</artifactid>
<version>1.1.2</version>
</dependency>
</dependencies>

That's all dependencies that are needed to have KIE Server Client embedded in custom application. Equipped with this we can start running KIE Server Client towards given server instance

Following is code snippet required to construct KIE Server Client instance using REST as transport

String serverUrl = "http://localhost:8230/kie-server/services/rest/server";
String user = "kieserver";
String password = "kieserver1!";

String containerId = "hr";
String processId = "hiring";

KieServicesConfiguration configuration = KieServicesFactory.newRestConfiguration(serverUrl, user, password);
// other formats supported MarshallingFormat.JSON or MarshallingFormat.XSTREAM
configuration.setMarshallingFormat(MarshallingFormat.JAXB);
// in case of custom classes shall be used they need to be added and client needs to be created with class loader that has these classes available
//configuration.addJaxbClasses(extraClasses);
//KieServicesClient kieServicesClient = KieServicesFactory.newKieServicesClient(configuration, kieContainer.getClassLoader());
KieServicesClient kieServicesClient = KieServicesFactory.newKieServicesClient(configuration);

Once we have the the client instance we can start executing operations. We start with checking if the container we want to work with is already deployed and if not deploy it

boolean deployContainer = true;
KieContainerResourceList containers = kieServicesClient.listContainers().getResult();
// check if the container is not yet deployed, if not deploy it
if (containers != null) {
for (KieContainerResource kieContainerResource : containers.getContainers()) {
if (kieContainerResource.getContainerId().equals(containerId)) {
System.out.println("\t######### Found container " + containerId + " skipping deployment...");
deployContainer = false;
break;
}
}
}
// deploy container if not there yet
if (deployContainer) {
System.out.println("\t######### Deploying container " + containerId);
KieContainerResource resource = new KieContainerResource(containerId, new ReleaseId("org.jbpm", "HR", "1.0"));
kieServicesClient.createContainer(containerId, resource);
}

Next let's check what is there available, in terms of processes and get some details about process id we are going to start


// query for all available process definitions
QueryServicesClient queryClient = kieServicesClient.getServicesClient(QueryServicesClient.class);
List<ProcessDefinition> processes = queryClient.findProcesses(0, 10);
System.out.println("\t######### Available processes" + processes);

ProcessServicesClient processClient = kieServicesClient.getServicesClient(ProcessServicesClient.class);
// get details of process definition
ProcessDefinition definition = processClient.getProcessDefinition(containerId, processId);
System.out.println("\t######### Definition details: " + definition);

We have all the details so we are ready to start the process instance for hiring process. We set two process variables:

  • name - of type string 
  • age - of type integer


// start process instance
Map<String, Object> params = new HashMap<String, Object>();
params.put("name", "john");
params.put("age", 25);
Long processInstanceId = processClient.startProcess(containerId, processId, params);
System.out.println("\t######### Process instance id: " + processInstanceId);

Once we started we can fetch tasks waiting to be completed for kieserver user

UserTaskServicesClient taskClient = kieServicesClient.getServicesClient(UserTaskServicesClient.class);
// find available tasks
List<TaskSummary> tasks = taskClient.findTasksAssignedAsPotentialOwner(user, 0, 10);
System.out.println("\t######### Tasks: " +tasks);

// complete task
Long taskId = tasks.get(0).getId();

taskClient.startTask(containerId, taskId, user);
taskClient.completeTask(containerId, taskId, user, null);


since the task has been completed and it has moved to another one we can continue until there are tasks available or we can simply abort the process instance to quit the work on this instance. Before we abort process instance let's examine what nodes has been completed so far

List<NodeInstance> completedNodes = queryClient.findCompletedNodeInstances(processInstanceId, 0, 10);
System.out.println("\t######### Completed nodes: " + completedNodes);

This will give us information if the task has already been completed and process moved on. Now let's abort the process instance

// at the end abort process instance
processClient.abortProcessInstance(containerId, processInstanceId);

ProcessInstance processInstance = queryClient.findProcessInstanceById(processInstanceId);
System.out.println("\t######### ProcessInstance: " + processInstance);

In the last step we get the process instance out to check if it was properly aborted - process instance state should be set to 3.

Last but not least, KIE Server Client can be used to insert facts and fire rules in very similar way

// work with rules
List<GenericCommand> commands = new ArrayList<GenericCommand>();
BatchExecutionCommandImpl executionCommand = new BatchExecutionCommandImpl(commands);
executionCommand.setLookup("defaultKieSession");

InsertObjectCommand insertObjectCommand = new InsertObjectCommand();
insertObjectCommand.setOutIdentifier("person");
insertObjectCommand.setObject("john");

FireAllRulesCommand fireAllRulesCommand = new FireAllRulesCommand();

commands.add(insertObjectCommand);
commands.add(fireAllRulesCommand);

RuleServicesClient ruleClient = kieServicesClient.getServicesClient(RuleServicesClient.class);
ruleClient.executeCommands(containerId, executionCommand);
System.out.println("\t######### Rules executed");

So that concludes simple usage scenario of KIE Server Client that covers

  • containers
  • processes
  • tasks
  • rules
A complete maven project with this sample execution can be found here.

Enjoy and stay tuned for more to come about awesome KIE Execution Server :)


Unified KIE Execution Server - Part 3

$
0
0
Part 3 of Unified KIE Execution Server deals with so called managed vs. unmanaged setup of the environment. In version 6.2 users went through Rules deployments perspective to create and manage KIE Execution Server instances.
That approach required to have execution server configured and up and running. Some sort of online only registration that did not work if the kie server instance was down.

In version 6.3, this has been enhanced to allow complete configuration of KIE Execution Servers inside workbench even if there is no actual instances configured. So let's first talk about managed and unmanaged instances....

Managed KIE Execution Server 

Managed instance is one that requires controller to be available to properly startup. Controller is a component responsible for keeping a configuration in centralized way. Though that does not mean there must be only single controller in the environment. Managed KIE Execution Servers are capable of dealing with multiple controllers.

NOTE: It's important to mention that even though there can be multiple controllers they should be kept in sync to make sure that regardless which one of them is contacted by KIE Server instance it will provide same set of configuration.

Controller is only needed when KIE Execution Server starts as this is the time when it needs to download the configuration before it can be properly started. In case KIE Execution Server is started it will keep trying to connect to controller until the connection is successfully established. That means that no containers will be deployed to it even when there is local storage available with configuration. The reason why it is like that is to ensure consistency. If KIE Execution Server was down and the configuration has changed, to make sure it will run with up to date configuration it must connect to controller to fetch that configuration.

Configuration has been mentioned several times but what is that? Configuration is set of information:

  • containers to be deployed and started
  • configuration items - currently this is a place holder for further enhancements that will allow remotely configure KIE Execution Server components - timers, persistence, etc

Controller is a component that is responsible for overall management of KIE Execution Servers. It provides a REST api that is divided into two parts:

  • controller itself that is exposed to interact with KIE Execution Server instances
  • administration that allows to remotely manage KIE Execution Server
    • add/remove servers
    • add/remove containers to/from the servers
    • start/stop containers on servers
Controller deals only with KIE Execution Server configuration or definition to put it differently. It does not handle any runtime components of KIE Execution Server instances. They are always considered remote to controller. Controller is responsible for persisting the configuration to preserve restarts of the controller itself. It should manage the synchronization as well in case multiple controllers are configured to keep all definitions up to date on all instances of the controller.

By default controller is shipped with KIE workbench (jbpm console) and allows fully featured management interface (both REST api and UI). It uses underlying git repository as persistent store and thus when GIT repositories are clustered (using Apache Zookeeper and Apache Helix) it will cover the controllers synchronization as well.

Above diagram illustrates single controller (workbench) setup with multiple KIE Execution Server instances managed by it. Following diagram illustrates the clustered setup where there are multiple instances of controller sync over Zookeeper.


In the above diagram we can see that KIE Execution Server instances are capable to connect to all controllers, but they will connect to only one. Each instance will attempt to connect to controller as long as it can reach one. Once connection is established with one of the controller it will skip other controllers.

Working with managed servers

There are two approaches that users can take when working with managed KIE Server instances:

Configuration first
With this approach, user will start working with controller (either UI or REST api) and create and configure KIE Execution Server definitions. That is composed of:
    • identification of the server (id and name + optionally version for improved readability)
    • containers 

Register first
Let the KIE Execution Server instance to auto register on controller and then configure it in terms of what containers to run on it. This is simply skipping the registration step done in first approach and populates it with server id, name and version directly upon auto registration (or to put it simple on connect)

In general there is no big difference and which approach is taken is pretty much a personal preference. The outcome of both will be the same.

Unmanaged KIE Execution Server

Unmanaged KIE Execution server is in turn just a standalone instance and thus must be configured individually using REST/JMS api of the KIE Execution server itself. The configuration is persisted into a file that is considered internal server state. It's updated upon following operations:
  • deploy container
  • undeploy container
  • start container
  • stop container
Note that KIE Execution server will start only the containers that are marked as started. Even if the KIE Execution Server will be restarted, upon boot it will only make containers available that were in started state before server was shutdown.


In most of the case KIE Execution Server should be ran in managed mode as that provides lots of benefits in terms of control and configuration. More benefits will be noticed when discussing clustering and scalability of KIE Execution Servers where managed mode will show its true power :)

Let's run in managed mode

So that's about it in theory, let's try to run the KIE Execution Server in managed mode to see how this can be operated.

For that we need to have one Wildfly instance that will host the controller - KIE Workbench and another one that will hold KIE Execution Server. Second we already have based on part 1 of the blog series.
NOTE: You can run both KIE workbench and KIE Execution Server on the same application server instance but it won't show the improved manageability as they will always be up or down together. 

So let's start with installing workbench on Wildfly. Similar to what we had to do for KIE Execution server we start with creating user(s):
  • kieserver (with password kieserver1!) that will be used to communicate between KIE Server and controller, that user must be member of following roles:
    • kie-server
    • rest-all
  • either add following roles to kieserver user or create another user that will be used to logon to KIE workbench to manage KIE Execution Servers
    • admin
    • rest-all
To do so use the Wildfly utility script - add-user located in WILDFLY_HOME/bin and add application users. (for details how to do that part 1 of this blog series)

Once we have the users created, let's deploy the application to it. Download KIE workbench for wildfly 8 and copy the way file into WILDFLY_HOME/standalone/deployments.

NOTE: similar to KIE Server, personally I remove the version number and classifier from the war file name and make it as simple as 'kie-wb.war' that makes the context path short and thus easier to type.

And now we are ready to launch KIE workbench, to do so go to WILDFLY_HOME/bin and start it with following command:

./standlone.sh --server-config=standalone-full.xml

wait for the server to finish booting and then go to: 


logon with user you created (e.g. kieserver) and go to Deployments --> Rules Deployments perspective. See following screencast (no audio) that showcase the capabilities described in this article. It starts with configure first approach and does show following:
  • create KIE Execution Server definition in the controller
    • specified identifier (first-kie-server) and name
  • create new container in the KIE Execution Server definition (org.jbpm:HR:1.0)
  • configure KIE Execution Server to be managed by specifying URL to the controller via system property:
    • -Dorg.kie.server.controller=http://localhost:8080/kie-wb/rest/controller
    • -Dorg.kie.server.id=first-kie-server (this is extremely important that this id matches one created in first step in the KIE Workbench)
  • start kie server and observe controller's log to see notification that kie server has connected to it
  • start container in controller and observe it being automatically started on KIE Execution Server instance
  • shutdown KIE Execution Server and observe logs and UI with updated status of kie server being disconnected
  • illustrates various manage options in controller and it effect on KIE Execution Server instance.


So this screen cast concludes third part of the Unified KIE Execution Server series. With this in mind we move on into more advanced cases where we show integration with non java clients and clustering. More will come soon...


Unified KIE Execution Server - Part 4

$
0
0
Here we come with next part of the Unified KIE Execution Server blog series - this time Part 4 that introduces Client UI written in JavaScript - AngularJS.
This aims at illustrating how easy it is to built fully featured Client UI that interacts with KIE Execution Server through REST API.

KIE Execution Server has been designed from the very beginning to be lightweight and consumable with whatever technology you like. Obviously it has to run on Java but components that integrate with it can be written in any language. To demonstrate that it actually works I came up with very basic UI written in AngularJS that uses:

  • REST API
  • JSON as data format

So what can it do? Quite a lot to be honest - although those who are familiar with AngularJS will directly notice that I am not an expert in this area while looking at the code. Apologies for that, although this was not the intention to show best practice in building AngularJS applications but to show you how easy it is (as I managed to do so :)) to interact with KIE Execution Server.

Let's start with it then...

Installation

Installation is extremely  simple - just clone this repository where you find jbpm-angular-js module. This is the application that we'll be using for the demo. Once you have it locally 
  • copy app folder that exists in jbpm-angular-js into your wildfly installation:
          WILDFLY_HOME/standalone/deployments
          it should be co-located with kie-server.war
  • rename the folder from app to app.war
And that's it, your installation is complete.

NOTE: we did put that on the same server as KIE Execution Server to avoid any CORS releated issues that will come up when using JavaScript application that resides on different server than the back end application.

Now you can start the Wildfly server and (assuming you use configuration used in previous parts of this blog series) access the AngularJS application at: 


AngularJS logon screen for KIE Execution Server app
You'll be presented with very simple logon screen that asks (as usual) for user name and password and in addition to that for KIE Execution Server URL that will be used as our backend service. Here you can simply put:


Make sure to provide valid credentials (e.g kieserver/kieserver1!) that are known to KIE Execution Server to be properly authenticated.

Demo description

Let's try to make use of the application and backend KIE Execution Server to see how it works. Here are list of steps we are going to perform to illustrate capabilities of custom UI application:
  • look at available containers 
  • look at available process definitions
  • examine details of process definition we are going to start an instance of
  • start process instance with variables (both simple type and custom type)
  • examine process instance details
  • work with user tasks
    • list available user tasks for logged in user
    • examine details of selected task
    • claim task
    • start task
    • complete task with variables (complex type)
Following screenshot shows the process definition that we are going to use:


A very simple process that consists of two user tasks:
  • first 'Review and Register' is used for gathering data from assigned user
  • second 'Show details' is just for the demo purpose to illustrate that process variable was properly updated with data given in first task
This process has two process variables:
  • person - that is of type org.jbpm.test.Person and consists of following fields
    • name - String
    • address - String
    • age - Integer
    • registered - Boolean
  • note - String
While working with this process we are going to exchange data between client (JavaScript) and server (Java) and as data format we will use JSON.

An important note for this application - this is a vary basic and generic application so it requires to provide valid JSON values when working with variables. To give an example (or two...)

  • "my string" - for string type
  • 123 - for number type
  • {"one", "two", "three"} - for list of strings
  • {"Person":{"name":"john","age":25}} - for custom objects 
Custom objects requires identifier that KIE Execution Server can use when unmarshalling to proper type. This can be given in either way:
  • Simple class name = Person
  • Fully qualified class name = org.jbpm.test.Person
Both formats are supported, though FQCN is usually safer (in case of possible conflicts when there are more than one class with same simple name). That's not so common case therefore short/simple name might be used in most of the cases.

Before it can be actually used (as presented in below screencast) you need to deploy the container to kie server. Deploy sample project called kie-server-demo that you can find in this repository (simply clone it and build locally with maven or with (even better) KIE workbench) - see part 3 on how to deploy containers/projects

Demo


Here is screen cast demoing entire application working with described process. 


I'd like to encourage you to give it a try yourself and see how does it fit your needs. With this you can start building UI for KIE Execution Server in the preferred technology/language. It's has never be so simple :)


Comments and ideas for improvements more than welcome.

Installing KIE Server and Workbench on same server

$
0
0
A common requirement for installation on development machine is to run both KIE Workbench and KIE Server on same server to simplify execution environment and avoid any port offset configuration.

This article will explain all installation steps needed to make this happen on two most frequently used containers:

  • Wildfly 8.2.0.Final
  • Apache Tomcat 8

Download binaries

So let's get our hands dirty and play around with some installation steps. First make sure you download correct versions of workbench and KIE Server for the container you target.

Wildfly

Tomcat

Wildfly

Deploy applications

Copy downloaded files into WILDFLY_HOME/standalone/deployments, while copying rename them to simplify the context paths that will be used on application server:
  • rename kie-wb-distribution-wars-6.3.0.Final-wildfly8.war to kie-wb.war
  • rename kie-server-6.3.0.Final-ee7.war to kie-server.war

Configure your server

With Wildfly there is not much to setup as both transaction manager and persistence (including data source) is already preconfigured.

Configure users

  • create user in application realm 
    • name: kieserver 
    • password: kieserver1!
    • roles: kie-server
  • create user in application realm to logon to workbench
    • name: workbench 
    • password: workbench!
    • roles: admin, kie-server

Configure system properties

Following list of properties needs to be given to work smoothly for both workbench and KIE Server:
  • -Dorg.kie.server.id=wildfly-kieserver 
  • -Dorg.kie.server.location=http://localhost:8080/kie-server/services/rest/server 
  • -Dorg.kie.server.controller=http://localhost:8080/kie-wb/rest/controller

Launching the server

best way is to add system properties into startup command when launching Wildfly server. Go to WILDFLY_HOME/bin and issue following command:

./standalone.sh --server-config=standalone-full.xml -Dorg.kie.server.id=wildfly-kieserver -Dorg.kie.server.location=http://localhost:8080/kie-server/services/rest/server -Dorg.kie.server.controller=http://localhost:8080/kie-wb/rest/controller

Tomcat


Deploy applications

Copy downloaded files into TOMCAT_HOME/webapps, while copying rename them to simplify the context paths that will be used on application server:
  • rename kie-wb-distribution-wars-6.3.0.Final-tomcat7.war to kie-wb.war
  • rename kie-server-6.3.0.Final-webc.war to kie-server.war

Configure your server

  1. Copy following libraries into TOMCAT_HOME/lib
    1. btm-2.1.4
    2. btm-tomcat55-lifecycle-2.1.4
    3. h2-1.3.161
    4. jacc-1.0
    5. jta-1.1
    6. kie-tomcat-integration-6.3.0.Final
    7. slf4j-api-1.7.2
    8. slf4j-api-1.7.2
  2. Create Bitronix configuration files to enable JTA transaction manager
  • Create file 'btm-config.properties' under TOMCAT_HOME/conf with following content
bitronix.tm.serverId=tomcat-btm-node0
bitronix.tm.journal.disk.logPart1Filename=${btm.root}/work/btm1.tlog
bitronix.tm.journal.disk.logPart2Filename=${btm.root}/work/btm2.tlog
bitronix.tm.resource.configuration=${btm.root}/conf/resources.properties
  • Create file 'resources.properties' under TOMCAT_HOME/conf with following content
resource.ds1.className=bitronix.tm.resource.jdbc.lrc.LrcXADataSource
resource.ds1.uniqueName=jdbc/jbpm
resource.ds1.minPoolSize=10
resource.ds1.maxPoolSize=20
resource.ds1.driverProperties.driverClassName=org.h2.Driver
resource.ds1.driverProperties.url=jdbc:h2:mem:jbpm
resource.ds1.driverProperties.user=sa
resource.ds1.driverProperties.password=
resource.ds1.allowLocalTransactions=true

Configure users

Create following users in tomcat-users.xml under TOMCAT_HOME/conf
  • create user
    • name: kieserver 
    • password: kieserver1!
    • roles: kie-server
  • create user to logon to workbench
    • name: workbench 
    • password: workbench!
    • roles: admin, kid-server

<tomcat-users>
<role rolename="admin"/>
<role rolename="analyst"/>
<role rolename="user"/>
<role rolename="kie-server"/>

<user username="workbench" password="workbench1!" roles="admin,kie-server"/>
<user username="kieserver" password="kieserver1!" roles="kie-server"/>
</tomcat-users>

Configure system properties

Configure following system properties in file setenv.sh under TOMCAT_HOME/bin
-Dbtm.root=$CATALINA_HOME 
-Dorg.jbpm.cdi.bm=java:comp/env/BeanManager 
-Dbitronix.tm.configuration=$CATALINA_HOME/conf/btm-config.properties 
-Djbpm.tsr.jndi.lookup=java:comp/env/TransactionSynchronizationRegistry 
-Djava.security.auth.login.config=$CATALINA_HOME/webapps/kie-wb/WEB-INF/classes/login.config 
-Dorg.kie.server.persistence.ds=java:comp/env/jdbc/jbpm 
-Dorg.kie.server.persistence.tm=org.hibernate.service.jta.platform.internal.BitronixJtaPlatform 
-Dorg.kie.server.id=tomcat-kieserver 
-Dorg.kie.server.location=http://localhost:8080/kie-server/services/rest/server 
-Dorg.kie.server.controller=http://localhost:8080/kie-wb/rest/controller

NOTE: Simple copy this into setenv.sh files to properly setup KIE Server and Workbench on Tomcat:
CATALINA_OPTS="-Xmx512M -XX:MaxPermSize=512m -Dbtm.root=$CATALINA_HOME -Dorg.jbpm.cdi.bm=java:comp/env/BeanManager -Dbitronix.tm.configuration=$CATALINA_HOME/conf/btm-config.properties -Djbpm.tsr.jndi.lookup=java:comp/env/TransactionSynchronizationRegistry -Djava.security.auth.login.config=$CATALINA_HOME/webapps/kie-wb/WEB-INF/classes/login.config -Dorg.kie.server.persistence.ds=java:comp/env/jdbc/jbpm -Dorg.kie.server.persistence.tm=org.hibernate.service.jta.platform.internal.BitronixJtaPlatform -Dorg.kie.server.id=tomcat-kieserver -Dorg.kie.server.location=http://localhost:8080/kie-server/services/rest/server -Dorg.kie.server.controller=http://localhost:8080/kie-wb/rest/controller"

Launching the server

Go to TOMCAT_HOME/bin and issue following command:
./startup.sh

Going beyond default setup

Disabling KIE Server extensions

And that's all to do to setup both KIE Server and Workbench on single server instance (either Wildfly or Tomcat). This article focused on fully featured KIE server installation meaning both BRM (rules) and BPM (processes, tasks) capabilities. Although KIE Server can be configured to serve only subset of the capabilities - e.g. only BRM or only BPM.

To do so one can configure KIE Server with system properties to disable extensions (BRM or BPM)

Wildfly:
add following system property to startup command:
  • disable BRM: -Dorg.drools.server.ext.disabled=true
  • disable BPM: -Dorg.jbpm.server.ext.disabled=true
So the startup command would look like this:
./standalone.sh --server-config=standalone-full.xml -Dorg.kie.server.id=wildfly-kieserver -Dorg.kie.server.location=http://localhost:8080/kie-server/services/rest/server -Dorg.kie.server.controller=http://localhost:8080/kie-wb/rest/controller -Dorg.jbpm.server.ext.disabled=true

Tomcat
add following system property to setenv.sh script (must be still part of CATALINA_OPTS configuration):
  • disable BRM: -Dorg.drools.server.ext.disabled=true
  • disable BPM: -Dorg.jbpm.server.ext.disabled=true
Complete content of setenv.sh is as follows:
CATALINA_OPTS="-Xmx512M -XX:MaxPermSize=512m -Dbtm.root=$CATALINA_HOME -Dorg.jbpm.cdi.bm=java:comp/env/BeanManager -Dbitronix.tm.configuration=$CATALINA_HOME/conf/btm-config.properties -Djbpm.tsr.jndi.lookup=java:comp/env/TransactionSynchronizationRegistry -Djava.security.auth.login.config=$CATALINA_HOME/webapps/kie-wb/WEB-INF/classes/login.config -Dorg.kie.server.persistence.ds=java:comp/env/jdbc/jbpm -Dorg.kie.server.persistence.tm=org.hibernate.service.jta.platform.internal.BitronixJtaPlatform -Dorg.kie.server.id=tomcat-kieserver -Dorg.kie.server.location=http://localhost:8080/kie-server/services/rest/server -Dorg.kie.server.controller=http://localhost:8080/kie-wb/rest/controller -Dorg.jbpm.server.ext.disabled=true"

Changing data base and persistence settings

Since by default persistence uses just in memory data base (H2) it is good enough for first tryouts or demos but not for real usage. So to be able to change persistence settings following needs to be done:

KIE Workbench on Wildfly
Modify data source configuration in Wildfly - either via manual editing of standalone-full.xml file or using tools such as Wildfly CLI. See Wildfly documentation on how to define data sources.

  • Next modify persistence.xml that resides inside workbench war file. Extract the kie-wb.war file into directory with same name and in same location (WILDFLY_HOME/standalone/deployments). 
  • Then navigate to kie-wb.war/WEB-INF/classes/META-INF
  • Edit persistence.xml file and change following elements
    • jta-data-source to point to the newly created data source (JNDI name) for your data base
    • hibernate.dialect to hibernate supported dialect name for you data base
KIE Server on Wildfly
there is no need to do any changes to the application (the war file) as the persistence can be reconfigured via system properties. Set following system properties at the end of server startup command

  • -Dorg.kie.server.persistence.ds=java:jboss/datasources/jbpmDS
  • -Dorg.kie.server.persistence.dialect=org.hibernate.dialect.MySQL5Dialect
Full command to start server will be:
./standalone.sh --server-config=standalone-full.xml -Dorg.kie.server.id=wildfly-kieserver -Dorg.kie.server.location=http://localhost:8080/kie-server/services/rest/server -Dorg.kie.server.controller=http://localhost:8080/kie-wb/rest/controller -Dorg.kie.server.persistence.ds=java:jboss/datasources/jbpmDS 
-Dorg.kie.server.persistence.dialect=org.hibernate.dialect.MySQL5Dialect

KIE Workbench on Tomcat
To modify data source configuration in Tomcat you need to alter resources.properties (inside TOMCAT_HOME/conf) file that defines data base connection. For MySQL it could look like this:

resource.ds1.className=com.mysql.jdbc.jdbc2.optional.MysqlXADataSource
resource.ds1.uniqueName=jdbc/jbpmDS
resource.ds1.minPoolSize=0
resource.ds1.maxPoolSize=10
resource.ds1.driverProperties.user=guest
resource.ds1.driverProperties.password=guest
resource.ds1.driverProperties.URL=jdbc:mysql://localhost:3306/jbpm
resource.ds1.allowLocalTransactions=true

Make sure you're copy mysql JDBC driver into TOMCAT_HOME/lib otherwise it won't provide proper connection handling.
  • Next modify persistence.xml that resides inside workbench war file. Extract the kie-wb.war file into directory with same name and in same location (TOMCAT_HOME/webapps). 
  • Then navigate to kie-wb.war/WEB-INF/classes/META-INF
  • Edit persistence.xml file and change following elements
    • jta-data-source to point to the newly created data source (JNDI name) for your data base
    • hibernate.dialect to hibernate supported dialect name for you data base
KIE Server on Tomcat
there is no need to do any changes to the application (the war file) as the persistence can be reconfigured via system properties. Set or modify (as data source is already defined there) following system properties in setenv.sh script inside TOMCAT_HOME/bin

  • -Dorg.kie.server.persistence.ds=java:comp/env/jdbc//jbpmDS
  • -Dorg.kie.server.persistence.dialect=org.hibernate.dialect.MySQL5Dialect
Complete content of the setenv.sh script is as follows:
CATALINA_OPTS="-Xmx512M -XX:MaxPermSize=512m -Dbtm.root=$CATALINA_HOME -Dorg.jbpm.cdi.bm=java:comp/env/BeanManager -Dbitronix.tm.configuration=$CATALINA_HOME/conf/btm-config.properties -Djbpm.tsr.jndi.lookup=java:comp/env/TransactionSynchronizationRegistry -Djava.security.auth.login.config=$CATALINA_HOME/webapps/kie-wb/WEB-INF/classes/login.config -Dorg.kie.server.persistence.ds=java:comp/env/jdbc/jbpmDS -Dorg.kie.server.persistence.tm=org.hibernate.service.jta.platform.internal.BitronixJtaPlatform 
-Dorg.kie.server.persistence.dialect=org.hibernate.dialect.MySQL5Dialect
-Dorg.kie.server.id=tomcat-kieserver -Dorg.kie.server.location=http://localhost:8080/kie-server/services/rest/server -Dorg.kie.server.controller=http://localhost:8080/kie-wb/rest/controller"

Note that KIE Server persistence is required only for BPM capability so if you disable it you can skip any KIE server related persistence changes.

And that would be it. Hopefully this article will help with installation of KIE Workbench and Server on single application server. 

Have fun and comments more than welcome.

Extending KIE Server capabilities

$
0
0
As a follow up of previous articles about  KIE Server, I'd like to present the extensibility support provided by KIE Server. Let's quickly look at KIE Server architecture...

Extensions overview

KIE Server is built around extensions, every piece of functionality is actually provided by extension. Out of the box we have following:

  • KIE Server extension - this is the default extension that provides management capabilities of the KIE Server - like creating or disposing containers etc
  • Drools extension - this extension provides rules (BRMS) capabilities, e.g. allows to inserting facts and firing rules (among others)
  • jBPM extension - this extensions provides process (BPMS) capabilities e.g. business process execution, user tasks, async jobs
  • jBPM UI extension - added in 6.4 additional extension that depends on jBPM extension and provides UI related capabilities - forms and process images
With just these out of the box capabilities KIE Server provides quite a bit of coverage. But that not all... extensions provide the capabilities but these capabilities must be somehow exposed to the users. And here KIE Server comes with two transports by default:
  • REST
  • JMS
Due to a need to be able to effectively manage extensions in runtime these are packaged in different jar files. So looking at the out of the box extensions we have following modules:
  • Drools extension
    • kie-server-services-drools
    • kie-server-rest-drools
  • jBPM extension
    • kie-server-services-jbpm
    • kie-server-rest-jbpm
  • jBPM UI extension
    • kie-server-services-jbpm-ui
    • kie-server-rest-jbpm-ui
All above modules are automatically discovered on runtime and registered in KIE Server if the are enabled (which by default they are). Extensions can be disabled using system properties
  • Drools extension
    • org.drools.server.ext.disabled = true
  • jBPM extension
    • org.jbpm.server.ext.disabled = true
  • jBPM UI extension
    • org.jbpm.ui.server.ext.disabled = true
But this is not all... if someone does not like the client api a client api can also be extended by implementing custom interfaces. This is why there is an extra step needed to get remote client:

kieServerClient.getServicesClient(Interface.class)

Why extensions are needed?

Let's not look at why would someone consider extending KIE server?

  • First and foremost is there might be missing functionality which is not yet implemented in KIE Server but exists in engines (process or rule engine). 
    • REST extension
  • Another use case is that something should be done differently than it is done out of the box - different parameters and so on..
    • client extension
  • Last but not least, it should be possible to extend the transport coverage meaning allow users to add other transports next to REST and JMS.
    • server extension
With this users can first of all, cover their requirements even if the out of the box KIE Server implementation does not provide required functionality. Next such extensions cane contributed to be included in the project or can be shipped as custom extensions available for other users.

This benefits both project and users so I'd like to encourage every one to look into details and think if there is anything missing and if so try to solve it by building extensions.

Let's extend KIE Server capabilities

Following three articles will provide details on how to build KIE Server extensions:

Important note: While most of the work could be achieved already with 6.3.0.Final I'd strongly recommend to give it a go with 6.4.0 (and thus all dependencies refer to 6.4.0-SNAPSHOT) as the extensions have been simplified a lot.

KIE Server: Extend existing server capability with extra REST endpoint

$
0
0
First and most likely the most frequently required extension to KIE Server is to extend REST api of already available extension - Drools or jBPM. There are few simple steps that needs to be done to provide extra endpoints in KIE Server.

Our use case

We are going to extend Drools extension with additional endpoint that will do very simple thing - expose single endpoint that will accept list of facts to be inserted and automatically call fire all rules and retrieve all objects from ksession.
Endpoint will be bound to following path:
server/containers/instances/{id}/ksession/{ksessionId}

where:
  • id is container identifier
  • ksessionId is name of the ksession within container to be used

Before you start create empty maven project (packaging jar) with following dependencies:


<properties>
<version.org.kie>6.4.0-SNAPSHOT</version.org.kie>
</properties>

<dependencies>
<dependency>
<groupId>org.kie</groupId>
<artifactId>kie-api</artifactId>
<version>${version.org.kie}</version>
</dependency>
<dependency>
<groupId>org.kie</groupId>
<artifactId>kie-internal</artifactId>
<version>${version.org.kie}</version>
</dependency>

<dependency>
<groupId>org.kie.server</groupId>
<artifactId>kie-server-api</artifactId>
<version>${version.org.kie}</version>
</dependency>
<dependency>
<groupId>org.kie.server</groupId>
<artifactId>kie-server-services-common</artifactId>
<version>${version.org.kie}</version>
</dependency>
<dependency>
<groupId>org.kie.server</groupId>
<artifactId>kie-server-services-drools</artifactId>
<version>${version.org.kie}</version>
</dependency>

<dependency>
<groupId>org.kie.server</groupId>
<artifactId>kie-server-rest-common</artifactId>
<version>${version.org.kie}</version>
</dependency>

<dependency>
<groupId>org.drools</groupId>
<artifactId>drools-core</artifactId>
<version>${version.org.kie}</version>
</dependency>
<dependency>
<groupId>org.drools</groupId>
<artifactId>drools-compiler</artifactId>
<version>${version.org.kie}</version>
</dependency>
<dependency>
<groupId>org.slf4j</groupId>
<artifactId>slf4j-api</artifactId>
<version>1.7.2</version>
</dependency>

</dependencies>

Implement KieServerApplicationComponentsService

First step is to implement org.kie.server.services.api.KieServerApplicationComponentsService that is responsible for delivering REST endpoints (aka resources) to the KIE Server infrastructure that will be then deployed on application start. This interface is very simple and has only one method:

Collection<Object> getAppComponents(String extension, 
                                    SupportedTransports type, Object... services)

this method is then invoked by KIE Server when booting up and should return all resources that REST container should deploy.

This method implementation should take into consideration following:

  • it is called by all extensions and thus it provides extension name so custom implementations can decide if this extension is for it or not
  • supported type - either REST or JMS - in our case it will be REST only
  • services - dedicated services to given extensions that can be then used as part of custom extension - usually these are engine services
Here is a sample implementation that uses Drools extension as base (and by that its services)


public class CusomtDroolsKieServerApplicationComponentsService implements KieServerApplicationComponentsService {

private static final String OWNER_EXTENSION = "Drools";

public Collection<Object> getAppComponents(String extension, SupportedTransports type, Object... services) {
// skip calls from other than owning extension
if ( !OWNER_EXTENSION.equals(extension) ) {
return Collections.emptyList();
}

RulesExecutionService rulesExecutionService = null;
KieServerRegistry context = null;

for( Object object : services ) {
if( RulesExecutionService.class.isAssignableFrom(object.getClass()) ) {
rulesExecutionService = (RulesExecutionService) object;
continue;
} else if( KieServerRegistry.class.isAssignableFrom(object.getClass()) ) {
context = (KieServerRegistry) object;
continue;
}
}

List<Object> components = new ArrayList<Object>(1);
if( SupportedTransports.REST.equals(type) ) {
components.add(new CustomResource(rulesExecutionService, context));
}

return components;
}

}


So what can be seen here is that it only reacts to Drools extension services and others are ignored. Next it will select RulesExecutionService and KieServerRegistry from available services. Last will create new CustomResource (implemented in next step) and returns it as part of the components list.

Implement REST resource

Next step is to implement custom REST resource that will be used by KIE Server to provide additional functionality. Here we do a simple, single method resource that:
  • uses POST http method
  • expects following data to be given:
    • container id as path argument
    • ksession id as path argument
    • list of facts as message payload 
  • supports all KIE Server data formats:
    • XML - JAXB
    • JSON
    • XML - Xstream
It will then unmarshal the payload into actual List<?> and create for each item in the list new InsertCommand. These inserts will be then followed by FireAllRules and GetObject commands. All will be then added as commands of BatchExecutionCommand and used to call rule engine. As simple as that. It is already available on KIE Server out of the box but requires complete setup of BatchExecutionCommand to be done on client side. Not that it's not possible but this extension is tailored one for simple pattern :
insert -> evaluate -> return

Here is how the simple implementation could look like:

@Path("server/containers/instances/{id}/ksession")
public class CustomResource {

private static final Logger logger = LoggerFactory.getLogger(CustomResource.class);

private KieCommands commandsFactory = KieServices.Factory.get().getCommands();

private RulesExecutionService rulesExecutionService;
private KieServerRegistry registry;

public CustomResource() {

}

public CustomResource(RulesExecutionService rulesExecutionService, KieServerRegistry registry) {
this.rulesExecutionService = rulesExecutionService;
this.registry = registry;
}

@POST
@Path("/{ksessionId}")
@Consumes({MediaType.APPLICATION_XML, MediaType.APPLICATION_JSON})
@Produces({MediaType.APPLICATION_XML, MediaType.APPLICATION_JSON})
public Response insertFireReturn(@Context HttpHeaders headers,
@PathParam("id") String id,
@PathParam("ksessionId") String ksessionId,
String cmdPayload) {

Variant v = getVariant(headers);
String contentType = getContentType(headers);

MarshallingFormat format = MarshallingFormat.fromType(contentType);
if (format == null) {
format = MarshallingFormat.valueOf(contentType);
}
try {
KieContainerInstance kci = registry.getContainer(id);

Marshaller marshaller = kci.getMarshaller(format);

List<?> listOfFacts = marshaller.unmarshall(cmdPayload, List.class);

List<Command<?>> commands = new ArrayList<Command<?>>();
BatchExecutionCommand executionCommand = commandsFactory.newBatchExecution(commands, ksessionId);

for (Object fact : listOfFacts) {
commands.add(commandsFactory.newInsert(fact, fact.toString()));
}
commands.add(commandsFactory.newFireAllRules());
commands.add(commandsFactory.newGetObjects());

ExecutionResults results = rulesExecutionService.call(kci, executionCommand);

String result = marshaller.marshall(results);


logger.debug("Returning OK response with content '{}'", result);
return createResponse(result, v, Response.Status.OK);
} catch (Exception e) {
// in case marshalling failed return the call container response to keep backward compatibility
String response = "Execution failed with error : " + e.getMessage();
logger.debug("Returning Failure response with content '{}'", response);
return createResponse(response, v, Response.Status.INTERNAL_SERVER_ERROR);
}

}
}


Make it discoverable

Once we have all that needs to be implemented, it's time to make it discoverable so KIE Server can find and register this extension on runtime. Since KIE Server is based on Java SE ServiceLoader mechanism we need to add one file into our extension jar file:

META-INF/services/org.kie.server.services.api.KieServerApplicationComponentsService

And the content of this file is a single line that represents fully qualified class name of our custom implementation of  KieServerApplicationComponentsService.


Last step is to build this project (which will result in jar file) and copy the result into:
 kie-server.war/WEB-INF/lib

And that's all that is needed. Start KIE Server and then you can start interacting with your new REST endpoint that relies on Drools extension.

Usage example

Clone this repositoryand build the kie-server-demo project. Once you build it you will be able to deploy it to KIE Server (either directly using KIE Server management REST api) or via KIE workbench controller.

Once deployed you can use following to invoke new endpoint:
URL: 
http://localhost:8080/kie-server/services/rest/server/containers/instances/demo/ksession/defaultKieSession

HTTP Method: POST
Headers:
Content-Type: application/json
Accept: application/json

Message payload:
[
{
  "org.jbpm.test.Person":{
     "name":"john",
     "age":25}
   },
  {
    "org.jbpm.test.Person":{
       "name":"mary",
       "age":22}
   }
]

A simple list with two items representing people, execute it and you should see following in server log:
13:37:20,347 INFO  [stdout] (default task-24) Hello mary
13:37:20,348 INFO  [stdout] (default task-24) Hello john

And the response should contain objects retrieved after rule evaluation where each Person object has:
  • address set to 'JBoss Community'
  • registered flag set to true

With this sample use case we illustrated how easy it is to extend REST api of KIE Server. Complete code for this extension can be found here.

KIE Server: Extend KIE Server with additional transport

$
0
0
There might be some cases where existing transports in KIE Server won't be sufficient, for whatever reason

  • not fast enough
  • difficult to deal with string based data formats (JSON, XML)
  • you name it..so there might be a need to build a custom transport to overcome this limitation.

Use case

Add additional transport to KIE Server that allows to use Drools capabilities. For this example we will use Apache Mina as underlying transport framework and we're going to exchange string based data that will still rely on existing marshaling operations. For simplicity reason we support only JSON format.

Before you start create empty maven project (packaging jar) with following dependencies:

<properties>
<version.org.kie>6.4.0-SNAPSHOT</version.org.kie>
</properties>

<dependencies>
<dependency>
<groupId>org.kie</groupId>
<artifactId>kie-api</artifactId>
<version>${version.org.kie}</version>
</dependency>
<dependency>
<groupId>org.kie</groupId>
<artifactId>kie-internal</artifactId>
<version>${version.org.kie}</version>
</dependency>

<dependency>
<groupId>org.kie.server</groupId>
<artifactId>kie-server-api</artifactId>
<version>${version.org.kie}</version>
</dependency>
<dependency>
<groupId>org.kie.server</groupId>
<artifactId>kie-server-services-common</artifactId>
<version>${version.org.kie}</version>
</dependency>
<dependency>
<groupId>org.kie.server</groupId>
<artifactId>kie-server-services-drools</artifactId>
<version>${version.org.kie}</version>
</dependency>

<dependency>
<groupId>org.drools</groupId>
<artifactId>drools-core</artifactId>
<version>${version.org.kie}</version>
</dependency>
<dependency>
<groupId>org.drools</groupId>
<artifactId>drools-compiler</artifactId>
<version>${version.org.kie}</version>
</dependency>
<dependency>
<groupId>org.slf4j</groupId>
<artifactId>slf4j-api</artifactId>
<version>1.7.2</version>
</dependency>

<dependency>
<groupId>org.apache.mina</groupId>
<artifactId>mina-core</artifactId>
<version>2.0.9</version>
</dependency>

</dependencies>

Implement KieServerExtension

Main part of this implementation is done by implementing org.kie.server.services.api.KieServerExtension which is KIE Server extension main interface. This interface has number of methods which implementation depends on the actual needs:

In our case we don't need to do anything when container is created or disposed as we simply extend the Drools extension and rely on complete setup in that component. For this example we are mostly interested in implementing:
  • init method
  • destroy method
in these two methods we are going to manage life cycle of the Apache Mina server. 
public interface KieServerExtension {

boolean isActive();

void init(KieServerImpl kieServer, KieServerRegistry registry);

void destroy(KieServerImpl kieServer, KieServerRegistry registry);

void createContainer(String id, KieContainerInstance kieContainerInstance, Map<String, Object> parameters);

void disposeContainer(String id, KieContainerInstance kieContainerInstance, Map<String, Object> parameters);

List<Object> getAppComponents(SupportedTransports type);

<T> T getAppComponents(Class<T> serviceType);

String getImplementedCapability();

List<Object> getServices();

String getExtensionName();

Integer getStartOrder();
}

Next there are few methods that describe the extension:
  • getImplementedCapability - should instruct what kind of capability is covered by this extension, note that capability should be unique within KIE Server
  • getExtensionName - human readable name of this extension
  • getStartOrder - defined when given extension should be started, important for extensions that have dependencies to other extensions like in this case where it depends on Drools (startup order is set to 0) so our extension should start after drools one - thus set to 20
Remaining methods are left with standard implementation to fulfill interface requirements.

Here is the implementation of the KIE Server extension based on Apache Mina:

public class MinaDroolsKieServerExtension implements KieServerExtension {

private static final Logger logger = LoggerFactory.getLogger(MinaDroolsKieServerExtension.class);

public static final String EXTENSION_NAME = "Drools-Mina";

private static final Boolean disabled = Boolean.parseBoolean(System.getProperty("org.kie.server.drools-mina.ext.disabled", "false"));
private static final String MINA_HOST = System.getProperty("org.kie.server.drools-mina.ext.port", "localhost");
private static final int MINA_PORT = Integer.parseInt(System.getProperty("org.kie.server.drools-mina.ext.port", "9123"));

// taken from dependency - Drools extension
private KieContainerCommandService batchCommandService;

// mina specific
private IoAcceptor acceptor;

public boolean isActive() {
return disabled == false;
}

public void init(KieServerImpl kieServer, KieServerRegistry registry) {

KieServerExtension droolsExtension = registry.getServerExtension("Drools");
if (droolsExtension == null) {
logger.warn("No Drools extension available, quiting...");
return;
}

List<Object> droolsServices = droolsExtension.getServices();
for( Object object : droolsServices ) {
// in case given service is null (meaning was not configured) continue with next one
if (object == null) {
continue;
}
if( KieContainerCommandService.class.isAssignableFrom(object.getClass()) ) {
batchCommandService = (KieContainerCommandService) object;
continue;
}
}
if (batchCommandService != null) {
acceptor = new NioSocketAcceptor();
acceptor.getFilterChain().addLast( "codec", new ProtocolCodecFilter( new TextLineCodecFactory( Charset.forName( "UTF-8" ))));

acceptor.setHandler( new TextBasedIoHandlerAdapter(batchCommandService) );
acceptor.getSessionConfig().setReadBufferSize( 2048 );
acceptor.getSessionConfig().setIdleTime( IdleStatus.BOTH_IDLE, 10 );
try {
acceptor.bind( new InetSocketAddress(MINA_HOST, MINA_PORT) );

logger.info("{} -- Mina server started at {} and port {}", toString(), MINA_HOST, MINA_PORT);
} catch (IOException e) {
logger.error("Unable to start Mina acceptor due to {}", e.getMessage(), e);
}

}
}

public void destroy(KieServerImpl kieServer, KieServerRegistry registry) {
if (acceptor != null) {
acceptor.dispose();
acceptor = null;
}
logger.info("{} -- Mina server stopped", toString());
}

public void createContainer(String id, KieContainerInstance kieContainerInstance, Map<String, Object> parameters) {
// no op - it's already handled by Drools extension

}

public void disposeContainer(String id, KieContainerInstance kieContainerInstance, Map<String, Object> parameters) {
// no op - it's already handled by Drools extension

}

public List<Object> getAppComponents(SupportedTransports type) {
// nothing for supported transports (REST or JMS)
return Collections.emptyList();
}

public <T> T getAppComponents(Class<T> serviceType) {

return null;
}

public String getImplementedCapability() {
return "BRM-Mina";
}

public List<Object> getServices() {
return Collections.emptyList();
}

public String getExtensionName() {
return EXTENSION_NAME;
}

public Integer getStartOrder() {
return 20;
}

@Override
public String toString() {
return EXTENSION_NAME + " KIE Server extension";
}
}
As can be noticed main part of implementation is in the init method that is responsible for collecting services from Drools extensions and bootstrapping Apache Mina server.
Worth noticing is the TextBaseIOHandlerAdapter class that is used as handler on Mina server that in essence will react to incoming requests.

Implement Apache Mina handler

Here is the implementation of the handler class that receives text message and executes it on drools service. 

public class TextBasedIoHandlerAdapter extends IoHandlerAdapter {

private static final Logger logger = LoggerFactory.getLogger(TextBasedIoHandlerAdapter.class);

private KieContainerCommandService batchCommandService;

public TextBasedIoHandlerAdapter(KieContainerCommandService batchCommandService) {
this.batchCommandService = batchCommandService;
}

@Override
public void messageReceived( IoSession session, Object message ) throws Exception {
String completeMessage = message.toString();
logger.debug("Received message '{}'", completeMessage);
if( completeMessage.trim().equalsIgnoreCase("quit") || completeMessage.trim().equalsIgnoreCase("exit") ) {
session.close(false);
return;
}

String[] elements = completeMessage.split("\\|");
logger.debug("Container id {}", elements[0]);
try {
ServiceResponse<String> result = batchCommandService.callContainer(elements[0], elements[1], MarshallingFormat.JSON, null);

if (result.getType().equals(ServiceResponse.ResponseType.SUCCESS)) {
session.write(result.getResult());
logger.debug("Successful message written with content '{}'", result.getResult());
} else {
session.write(result.getMsg());
logger.debug("Failure message written with content '{}'", result.getMsg());
}
} catch (Exception e) {

}
}
}

Few details about the handler implementation:
  • each incoming request is single line, so make sure before submitting anything to it make sure it's single line
  • there is a need to pass container id in this single line so this handler expects following format:
    • containerID|payload
  • response is set the way it is produced by marshaller and that can be multiple lines
  • handlers allows "stream mode" that allows to send commands without disconnecting from KIE Server session. to be able to quit the stream mode - send either exit or quit

Make it discoverable

Same story as for REST extension ... once we have all that needs to be implemented, it's time to make it discoverable so KIE Server can find and register this extension on runtime. Since KIE Server is based on Java SE ServiceLoader mechanism we need to add one file into our extension jar file:

META-INF/services/org.kie.server.services.api.KieServerExtension

And the content of this file is a single line that represents fully qualified class name of our custom implementation of  KieServerExtension.


Last step is to build this project (which will result in jar file) and copy the result into:
 kie-server.war/WEB-INF/lib

Since this extension depends on Apache Mina we need to copy mina-core-2.0.9.jar into  kie-server.war/WEB-INF/lib as well.

Usage example

Clone this repository and build the kie-server-demo project. Once you build it you will be able to deploy it to KIE Server (either directly using KIE Server management REST api) or via KIE workbench controller.

Once deployed and KIE Server started you should find in logs that new KIE Server extension started:
Drools-Mina KIE Server extension -- Mina server started at localhost and port 9123
Drools-Mina KIE Server extension has been successfully registered as server extension

That means we are now interact with our Apache Mina based transport in KIE Server. So let's give it a go... we could write a code to interact with Mina server but to avoid another coding exercise let's use... wait for it .... telnet :)

Start telnet and connect to KIE Server on port 9123:
telnet 127.0.0.1 9123

once connected you can easily interact with alive and kicking KIE Server:
Trying 127.0.0.1...
Connected to localhost.
Escape character is '^]'.
demo|{"lookup":"defaultKieSession","commands":[{"insert":{"object":{"org.jbpm.test.Person":{"name":"john","age":25}}}},{"fire-all-rules":""}]}
{
  "results" : [ {
    "key" : "",
    "value" : 1
  } ],
  "facts" : [ ]
}
demo|{"lookup":"defaultKieSession","commands":[{"insert":{"object":{"org.jbpm.test.Person":{"name":"john","age":25}}}},{"fire-all-rules":""}]}
{
  "results" : [ {
    "key" : "",
    "value" : 1
  } ],
  "facts" : [ ]
}
demo|{"lookup":"defaultKieSession","commands":[{"insert":{"object":{"org.jbpm.test.Person":{"name":"maciek","age":25}}}},{"fire-all-rules":""}]}
{
  "results" : [ {
    "key" : "",
    "value" : 1
  } ],
  "facts" : [ ]
}
exit
Connection closed by foreign host.

where:

  • green is request message
  • blue is response
  • orange is exit message


in the server side logs you will see something like this:
16:33:40,206 INFO  [stdout] (NioProcessor-2) Hello john
16:34:03,877 INFO  [stdout] (NioProcessor-2) Hello john
16:34:19,800 INFO  [stdout] (NioProcessor-2) Hello maciek

This illustrated the stream mode where we simply type in commands after command without disconnecting from the KIE Server.

This concludes this exercise and complete code for this can be found here.
Viewing all 140 articles
Browse latest View live